Building a Cloud Development Platform with Coder

Overview
Modern development workflows demand flexibility, consistency, and powerful tooling. Cloud development environments solve these challenges by providing on-demand, standardized workspaces that developers can access from anywhere. This post explores how I built a production-ready cloud development platform using Coder, Kubernetes, and homelab infrastructure.
What is Coder?
Coder is an open-source platform that provisions cloud development environments. Think of it as “development workspaces as a service” - developers can spin up fully-configured development machines on-demand, access them via SSH or web-based IDEs, and destroy them when done.
Key Benefits
- Consistent Environments: Every developer gets the same configuration
- Resource Efficiency: Share compute resources across the team
- Quick Onboarding: New developers get productive environments in minutes
- Secure Access: Centralized access control and audit logging
- Cost Control: Automatically stop idle workspaces to save resources
Infrastructure Architecture: The Complete Picture
The Coder platform runs on a sophisticated homelab infrastructure that demonstrates enterprise-grade architecture principles. Understanding the underlying infrastructure is critical to appreciating the platform’s capabilities and reliability.
Multi-Layer Architecture Overview
1
2
3
4
5
6
7
8
9
10
11
12
13
14
15
16
17
18
19
20
21
22
23
24
25
26
+================================================================+
| Kubernetes Control Plane (K3s)                                 |
| - Coder Server (2 replicas)                                    |
| - PostgreSQL Database                                          |
| - Vault (Secrets Management)                                   |
| - Forgejo (Git/CI/CD)                                          |
| - cliProxy (OAuth to API Key Translation)                      |
+================================================================+
                              |
                              ↓
+================================================================+
| Proxmox VE Cluster (Multiple Nodes)                            |
| - Workspace VM provisioning                                    |
| - Resource allocation (CPU, RAM, Disk)                         |
| - Network management                                           |
| - High availability and live migration                         |
| - NVMe local storage (ZFS replicated across nodes)             |
+================================================================+
                              |
                              ↓
+================================================================+
| TrueNAS Storage Cluster (Multiple Servers)                     |
| - NFS home directories (persistent user data)                  |
| - iSCSI block storage (VM disks)                               |
| - ZFS datasets with quotas                                     |
+================================================================+
🔥 Critical Infrastructure Detail: NVMe Storage Architecture
The NVMe storage referenced in the Proxmox layer is a key component of the high-availability design:
- Local NVMe on Each Proxmox Node: Each Proxmox node has its own NVMe storage pool
- Identical Storage Names: All nodes use the same storage pool name (e.g., “nvme-storage”)
- ZFS Replication: ZFS replication keeps data synchronized across all Proxmox nodes
- Kubernetes Cluster Storage: This replicated NVMe storage hosts the entire K3s cluster:
- Control plane nodes
- Gateway nodes
- Worker nodes
- All Kubernetes persistent volumes
Why This Matters:
This architecture enables true high availability - if a Proxmox node fails, the Kubernetes VMs can seamlessly migrate to another node because the NVMe storage is replicated. The identical storage naming means Proxmox sees the same storage pool name on every node, making live migration transparent.
Coder Deployment Flow:
- Kubernetes cluster runs on replicated NVMe across Proxmox nodes
- Coder Server deploys within this K3s cluster
- Coder provisions workspace VMs on Proxmox using available resources
- Workspace VMs use TrueNAS for persistent home directories (NFS)
- Workspace VM disks are stored on TrueNAS iSCSI
Kubernetes Layer: Coder Control Plane
Cluster Configuration:
- Platform: K3s (lightweight Kubernetes)
- Node Count: 3 nodes (1 control plane + 2 workers)
- Networking: Flannel CNI with 10GbE backend
- Storage: Local path provisioner for persistent volumes
- Load Balancing: Traefik ingress controller
Deployed Services:
1
2
3
4
5
6
7
8
9
10
11
12
13
14
15
16
17
18
19
20
21
22
23
24
25
# Coder Server
replicas: 2
resources:
  cpu: 2 cores per pod
  memory: 4GB per pod
storage: PostgreSQL on persistent volume

# PostgreSQL
replicas: 1 (with backup strategy)
storage: 100GB persistent volume
backup: Daily snapshots to TrueNAS

# Vault
replicas: 1
storage: Persistent KV store
purpose: Proxmox credentials, API keys, secrets

# Forgejo
replicas: 1
storage: Git repositories on persistent volume
runners: 2 Forgejo Actions runners for CI/CD

# cliProxy
replicas: 2 (load balanced)
purpose: OAuth → API key translation for AI services
High Availability Considerations:
- Coder Server runs with 2 replicas for redundancy
- PostgreSQL has automated daily backups
- K3s control plane can be restored from etcd snapshots
- Traefik provides automatic failover for ingress
Proxmox VE Cluster: Compute Layer
Five-Node High-Availability Cluster:
The platform runs on a 5-node Proxmox VE cluster providing 170 CPU cores and 1.1 TB of RAM for workspace VMs and infrastructure services.
Node 1 (Primary Compute - High-Density)
- CPU: 80 cores (dual AMD EPYC or high-core-count Xeon)
- RAM: 539 GB
- Storage: Local NVMe for VM disks
- Network: 10GbE bonded (LACP)
- Role: Primary workspace VM host, high-density workloads
- Current Load: ~14% CPU utilization
Node 2 (Secondary High-Performance)
- CPU: 40 cores (AMD EPYC/Ryzen or Xeon)
- RAM: 270 GB
- Storage: Local NVMe
- Network: 10GbE bonded
- Role: Production workloads, resource-intensive workspaces
- Current Load: ~3% CPU utilization
Node 3 (Tertiary Compute)
- CPU: 36 cores
- RAM: 270 GB
- Storage: Local NVMe
- Network: 10GbE bonded
- Role: General workspace hosting, HA quorum
- Current Load: ~7% CPU utilization
- Uptime: Exceptionally stable (weeks of continuous operation)
Node 4 (Management/Services)
- CPU: 8 cores
- RAM: 33 GB
- Storage: Local SSD
- Network: 10GbE
- Role: Infrastructure services, monitoring, lightweight workloads
- Current Load: ~6% CPU utilization
Node 5 (Edge/Development)
- CPU: 6 cores
- RAM: 16 GB
- Storage: Local SSD
- Network: 1GbE (separate location/network segment)
- Role: Dev/test workloads, edge computing, isolated workspaces
- Current Load: ~7% CPU utilization
Aggregate Cluster Capacity:
- Total CPU Cores: 170 cores (current avg utilization: <10%)
- Total RAM: 1.1 TB (current usage: ~487 GB / 44%)
- High Availability: 5-node quorum, supports 2 node failures
- Live Migration: VMs can migrate between nodes with zero downtime
- Storage Backend: iSCSI from TrueNAS cluster + local NVMe
- Network: Dedicated 10GbE storage VLAN, bonded management interfaces
- API Integration: Terraform provisioning via Vault-stored credentials
TrueNAS Storage Cluster: Persistence Layer
Four-Server Enterprise Storage Architecture:
The platform leverages four dedicated TrueNAS servers providing a combined 317+ TB of enterprise-grade ZFS storage with RAIDZ2 redundancy across all pools.
TrueNAS-01 (Primary NFS Server)
- Pool: Storage0
- Capacity: 43.64 TB usable (RAIDZ2, 6-drive array)
- Purpose: NFS home directories, workspace persistent data
- Network: 10GbE bonded (LACP)
- Datasets: Per-user ZFS datasets with quotas
- Export: NFSv4 with Kerberos authentication
- Current Usage: 65.82% (28.73 TB allocated)
- Snapshots: Automated hourly snapshots, 7-day retention
TrueNAS-02 (High-Capacity Storage)
- Pool 1 (storage01): 87.28 TB usable (RAIDZ2, 8-drive array)
- Pool 2 (storage02): 76.38 TB usable (RAIDZ2, 7-drive array)
- Total Capacity: 163.66 TB
- Purpose: Large dataset storage, backup targets, archive storage
- Network: 10GbE bonded
- Protocols: NFS, iSCSI, SMB
- Current Usage: 0.01% (practically empty, ready for expansion)
- Redundancy: Dual parity (RAIDZ2) - tolerates 2 disk failures per pool
TrueNAS-03 (VM Block Storage)
- Pool 1 (vmstore1): 6.53 TB usable (RAIDZ2, 6-drive array)
- Pool 2 (vmstore2): 16.34 TB usable (2x RAIDZ2 vdevs, 5 drives each)
- Total Capacity: 22.88 TB
- Purpose: iSCSI LUNs for Proxmox VM disks
- Network: 10GbE dedicated VLAN for storage traffic
- Performance: Low-latency iSCSI for production VMs
- Current Usage: vmstore1 at 53%, vmstore2 at 3%
- Fragmentation: vmstore1 at 46% (active VM workloads)
TrueNAS-04 (Expansion/Backup)
- Pool: tank
- Capacity: 87.28 TB usable (RAIDZ2, 8-drive array)
- Purpose: Replication target, disaster recovery, cold storage
- Network: 10GbE
- Current Usage: 0.13% (120 GB allocated)
- Replication: Receives snapshots from other TrueNAS servers
Aggregate Storage Capacity:
- Total Raw Capacity: 317.46 TB usable across all pools
- Total Allocated: ~33 TB (10.4% utilization)
- Total Available: ~284 TB ready for growth
- All Pools: RAIDZ2 redundancy (dual parity)
- Network Throughput: 10GbE across all servers
- Data Protection: Automated snapshots, scrubs, and cross-server replication
TrueNAS Storage Cluster: Persistence Layer
Multi-Server Architecture:
The platform uses multiple TrueNAS servers to provide distributed, redundant storage for different use cases:
TrueNAS Server 1 (Primary NFS)
- Purpose: NFS home directories for workspaces
- Storage: 8TB usable ZFS pool (RAIDZ2)
- Network: 2x 10GbE (LACP bonded)
- Datasets: Individual ZFS datasets per user with quotas
- Export: NFSv4 with Kerberos authentication
- Performance: ~900MB/s sequential read/write
- Snapshots: Hourly snapshots, retained for 7 days
TrueNAS Server 2 (iSCSI Block Storage)
- Purpose: iSCSI LUNs for Proxmox VM disks
- Storage: 16TB usable ZFS pool (RAIDZ2)
- Network: Dedicated 10GbE for iSCSI traffic
- LUNs: Block storage for workspace VM boot disks
- Performance: ~600MB/s with low latency
- Use Case: General development workspaces needing ample capacity
TrueNAS Server 3 (NVMe/SSD Pool)
- Purpose: High-performance NVMe-backed storage
- Storage: 4TB NVMe ZFS pool (mirrors)
- Network: 10GbE with RDMA support
- Export: NFSv4 + iSCSI for high-IOPS workloads
- Performance: ~2GB/s, <100μs latency
- Use Case: Database development, compilation-heavy workloads
Storage Selection in Templates:
Workspace templates allow developers to choose storage backend:
1
2
3
4
5
6
7
8
9
10
11
12
13
14
15
16
17
18
19
data "coder_parameter" "storage_backend" {
  name = "storage_type"
  option {
    name = "iSCSI (Ample Capacity)"
    value = "iscsi"
    description = "16TB pool, good for most workloads"
  }
  option {
    name = "NVMe (High Performance)"
    value = "nvme"
    description = "4TB pool, ultra-low latency"
  }
}

resource "proxmox_virtual_environment_vm" "workspace" {
  disk {
    datastore_id = var.storage_backend == "nvme" ? "nvme-pool" : "iscsi-pool"
  }
}
NFS Home Directory Architecture:
All workspaces mount their home directory from TrueNAS Server 1 via NFS:
1
2
3
4
Workspace VM → 10GbE Network → TrueNAS NFS Server → ZFS Dataset
     ↓                                                      ↓
  /home/${username}                              /mnt/tank/coder/users/${username}/${workspace}
  (NFS mount)                              (ZFS dataset with quota)
Benefits:
- True Persistence: Home directory survives workspace destruction
- Quota Enforcement: ZFS quotas prevent runaway disk usage
- Snapshots: Hourly snapshots for accidental deletion recovery
Data Persistence: The NFS Architecture That Changes Everything
The Problem with Ephemeral VMs
By default, Coder treats workspace VMs as ephemeral - when you stop, restart, or rebuild a workspace, the VM is destroyed and recreated from scratch. This is fantastic for ensuring clean, reproducible environments, but it creates a critical challenge: where does your data go?
Traditional solutions involve:
- Local VM storage: Lost on every rebuild
- Git repositories: Only code, not your entire development environment
- Manual backups: Time-consuming and error-prone
For a production-grade developer platform, we needed something better: true persistence that survives VM destruction while maintaining the clean-slate benefits of ephemeral infrastructure.
The Solution: External NFS + ZFS Dataset Lifecycle Management
The breakthrough came from separating compute (ephemeral VMs) from storage (persistent NFS mounts). Here’s how it works:
1
2
3
4
5
6
7
8
9
10
11
12
13
14
15
16
17
18
19
20
21
22
23
24
25
26
27
28
29
30
31
32
33
34
35
36
37
38
39
40
41
42
43
┌─────────────────────────────────────────────────────────────────┐
│                    Workspace Lifecycle                          │
├─────────────────────────────────────────────────────────────────┤
│                                                                 │
│  Workspace Created:                                             │
│  ┌─────────────────────────────────────────────────────────┐   │
│  │ 1. Terraform: Run truenas-dataset-manager.sh create    │   │
│  │    → Creates ZFS dataset: tank/coder/users/john/ws1    │   │
│  │    → Sets quota: 100GB (user-configurable)             │   │
│  │    → Creates NFS share for dataset                     │   │
│  │    → Sets ownership: uid 1000, gid 1000                │   │
│  │                                                         │   │
│  │ 2. Proxmox: Provision VM from template                 │   │
│  │    → CPU: 4 cores (slider: 1-8)                        │   │
│  │    → RAM: 8GB (slider: 2-32GB)                         │   │
│  │    → Disk: 40GB local (slider: 20-100GB)               │   │
│  │                                                         │   │
│  │ 3. Cloud-init: Mount NFS on first boot                 │   │
│  │    → mount 192.168.x.x:/mnt/tank/coder/users/john/ws1  │   │
│  │    →      /home/${username}                                  │   │
│  │    → All user data now on persistent NFS              │   │
│  └─────────────────────────────────────────────────────────┘   │
│                                                                 │
│  Workspace Stopped/Started/Rebuilt:                            │
│  ┌─────────────────────────────────────────────────────────┐   │
│  │ VM Destroyed → Recreated from template                 │   │
│  │ NFS Dataset: UNTOUCHED - still exists on TrueNAS      │   │
│  │ On boot: Re-mounts same NFS share                     │   │
│  │ Result: All files, configs, history preserved         │   │
│  └─────────────────────────────────────────────────────────┘   │
│                                                                 │
│  Workspace DELETED:                                             │
│  ┌─────────────────────────────────────────────────────────┐   │
│  │ 1. Terraform destroy triggers:                          │   │
│  │    → truenas-dataset-manager.sh delete john ws1        │   │
│  │    → Finds NFS share by path, deletes it              │   │
│  │    → Runs: zfs destroy -r tank/coder/users/john/ws1   │   │
│  │    → Dataset and all data permanently removed          │   │
│  │                                                         │   │
│  │ 2. VM deleted from Proxmox                             │   │
│  └─────────────────────────────────────────────────────────┘   │
│                                                                 │
└─────────────────────────────────────────────────────────────────┘
The Magic Script: truenas-dataset-manager.sh
This Bash script is the heart of the persistence architecture. It manages the complete lifecycle of ZFS datasets and NFS shares through a clever SSH routing pattern:
Coder Server (K3s) → Proxmox Host → TrueNAS
The script provides four operations:
1. Create Dataset with Quota
1
2
3
4
5
6
7
8
9
10
/usr/local/bin/coder-scripts/truenas-dataset-manager.sh create john workspace-1 100

# What happens:
# 1. SSH to Proxmox (192.168.x.x)
# 2. From Proxmox, SSH to TrueNAS (192.168.x.x)
# 3. Create ZFS dataset: zfs create -p tank/coder/users/john/workspace-1
# 4. Set quota: zfs set refquota=100G tank/coder/users/john/workspace-1
# 5. Set ownership: chown -R 1000:1000 /mnt/tank/coder/users/john/workspace-1
# 6. Create NFS share via TrueNAS midclt API
# 7. Return to Coder, continue provisioning
2. Delete Dataset (Workspace Deletion Only)
1
2
3
4
5
6
7
8
/usr/local/bin/coder-scripts/truenas-dataset-manager.sh delete john workspace-1

# What happens:
# 1. SSH to Proxmox → TrueNAS
# 2. Find NFS share ID by path using midclt query
# 3. Delete NFS share: midclt call sharing.nfs.delete <id>
# 4. Destroy dataset: zfs destroy -r tank/coder/users/john/workspace-1
# 5. All user data for this workspace permanently removed
3. Update Quota (User Adjusts Slider)
1
2
3
4
/usr/local/bin/coder-scripts/truenas-dataset-manager.sh update-quota john workspace-1 200

# User increased storage from 100GB to 200GB
# ZFS immediately applies new quota without downtime
4. Check Quota (Monitoring)
1
2
3
4
5
6
/usr/local/bin/coder-scripts/truenas-dataset-manager.sh check-quota john workspace-1

# Returns:
# tank/coder/users/john/workspace-1  refquota  200G
# tank/coder/users/john/workspace-1  used      45.3G
# tank/coder/users/john/workspace-1  available 154.7G
Terraform Integration: The Critical Lifecycle Hooks
In each Coder template (main.tf), the dataset lifecycle is managed with Terraform’s null_resource and provisioners:
1
2
3
4
5
6
7
8
9
10
11
12
13
14
15
16
17
18
19
20
21
22
23
24
25
26
27
resource "null_resource" "nfs_dataset" {
  # CREATE: Run when workspace is created or quota changes
  provisioner "local-exec" {
    command = "/usr/local/bin/coder-scripts/truenas-dataset-manager.sh create ${data.coder_workspace_owner.me.name} ${data.coder_workspace.me.name} ${data.coder_parameter.storage_quota.value}"
  }

  # DELETE: Run ONLY when workspace is destroyed (not stopped!)
  provisioner "local-exec" {
    when    = destroy
    command = "/usr/local/bin/coder-scripts/truenas-dataset-manager.sh delete ${self.triggers.username} ${self.triggers.workspace_name} || true"
  }

  # Triggers: Recreate if these values change
  triggers = {
    workspace_name = data.coder_workspace.me.name
    username       = data.coder_workspace_owner.me.name
    storage_quota  = data.coder_parameter.storage_quota.value
  }
}

# VM must wait for NFS dataset to be ready
resource "proxmox_virtual_environment_vm" "workspace" {
  depends_on = [null_resource.nfs_dataset]

  # VM configuration...
  # On boot, cloud-init mounts the NFS share
}
Key Design Decision: The when = destroy provisioner only runs on workspace deletion, not on stop/start/rebuild. This means:
✅ Stop workspace: VM deleted, NFS dataset untouched
✅ Start workspace: New VM created, mounts existing NFS dataset, all data intact
✅ Rebuild workspace: Old VM deleted, new VM created, mounts existing NFS, data preserved
✅ Delete workspace: VM deleted, THEN NFS dataset deleted permanently
Why This Architecture is Brilliant
- True Persistence: Your entire
/home/${username}directory survives any VM operation except deletion - Clean Rebuilds: Destroy and recreate VMs freely without worrying about data loss
- Per-User Isolation: Each workspace gets its own ZFS dataset with quota enforcement
- Storage Flexibility: Users can adjust quotas with a slider (10GB to 500GB)
- ZFS Benefits:
- Compression: Automatic LZ4 compression saves space
- Snapshots: TrueNAS can snapshot datasets for backup/rollback
- Deduplication: Optional dedup across users
- Quota Enforcement: Hard limits prevent one user filling the pool
- Secure Deletion: When a workspace is deleted, ALL data is destroyed - no orphaned datasets
- Network Independence: NFS mount works across any Proxmox node
Real-World Example: Developer Workflow
1
2
3
4
5
6
7
8
9
10
11
12
13
14
15
16
17
18
19
20
21
22
23
24
25
26
27
28
29
30
31
32
# Day 1: Create workspace
coder create my-project --template proxmox-vm-codex
# → ZFS dataset created: tank/coder/users/john/my-project (100GB)
# → VM created and mounts NFS
# → Install tools, clone repos, configure environment

# Day 2: Stop workspace to save resources
coder stop my-project
# → VM destroyed
# → NFS dataset untouched

# Day 3: Start workspace
coder start my-project
# → New VM created from template
# → Mounts existing NFS dataset
# → All files, configs, Docker containers still there!

# Week 2: Need more storage
# Open Coder UI → Rebuild workspace → Adjust slider: 100GB → 200GB
# → Terraform detects trigger change
# → Runs: truenas-dataset-manager.sh update-quota john my-project 200
# → ZFS immediately applies new quota
# → VM rebuilt with more storage capacity

# Month 3: Project complete, delete workspace
coder delete my-project
# → VM destroyed
# → Terraform destroy provisioner triggered
# → truenas-dataset-manager.sh delete john my-project
# → NFS share removed
# → ZFS dataset destroyed
# → All data permanently deleted
The Multi-Hop SSH Pattern
One fascinating aspect of this architecture is how it works around network topology. The Coder server (running in K3s) cannot directly SSH to TrueNAS due to network segmentation. The solution:
1
2
3
4
5
6
7
8
┌──────────────┐         ┌──────────────┐         ┌──────────────┐
│ Coder Server │ ──SSH──→│ Proxmox Host │ ──SSH──→│   TrueNAS    │
│   (K3s Pod)  │         │ 192.168.x.x │         │ 192.168.x.x  │
└──────────────┘         └──────────────┘         └──────────────┘
      ↓                         ↓                         ↓
  Executes              Has SSH access to           Manages ZFS
  Terraform             TrueNAS (management         datasets & NFS
  templates             network access)             shares
The script uses nested SSH commands:
1
ssh [email protected] "ssh [email protected] 'zfs create -p tank/coder/users/john/ws1'"
This pattern works because:
- Coder server has SSH keys for Proxmox
- Proxmox has SSH keys for TrueNAS
- All authentication is key-based (no passwords)
- Commands execute seamlessly across the chain
Performance Considerations
Why NFS over iSCSI?
- NFS: File-level protocol, perfect for home directories
- iSCSI: Block-level protocol, overkill for developer workspaces
- NFS advantages:
- No complex multipath setup
- Works seamlessly across Proxmox nodes
- Easy backup (TrueNAS snapshots)
- Simpler quota management
Network Performance:
- TrueNAS connected via 10GbE to Proxmox cluster
- NFS over TCP for reliability
- ZFS ARC (Adaptive Replacement Cache) on TrueNAS provides excellent read performance
- Developer workloads are not I/O intensive enough to saturate NFS
Why This Matters
This persistence architecture is the foundation that makes Coder viable for production use. Without it, developers would:
- Lose work on every rebuild
- Fear VM maintenance
- Store everything in Git (even databases, configs, etc.)
- Need manual backup strategies
With this architecture, developers get:
- Confidence: Stop/start/rebuild freely without fear
- Flexibility: Adjust resources without data loss
- Isolation: Per-workspace storage quotas
- Clean Slate: Delete workspace = clean deletion, no orphaned data
- Enterprise-Grade: Same patterns used by cloud providers (EBS, Persistent Disks, etc.)
The beauty is that it’s 100% open source - ZFS, NFS, Terraform, Bash - no proprietary magic, just solid engineering.
- Performance: 10GbE provides excellent throughput for development workloads
- Mobility: Workspaces can be recreated on any Proxmox node with same home directory
Networking Architecture
Note: The VLAN IDs and subnet ranges shown below are examples for illustration purposes.
Network Segmentation:
1
2
3
4
5
6
7
8
9
10
11
12
13
14
15
16
17
18
19
20
21
22
23
24
25
26
27
28
29
30
31
+================================================================+
| Management Network (Example: VLAN 10)                          |
| - Proxmox management interfaces                                |
| - TrueNAS management                                           |
| - Kubernetes API server                                        |
| Example Subnet: 192.168.10.x/24                                |
+================================================================+

+================================================================+
| Workspace Network (Example: VLAN 20)                           |
| - Workspace VM primary interfaces                              |
| - Internet access (NAT)                                        |
| - Inter-workspace communication                                |
| Example Subnet: 192.168.20.x/24                                |
+================================================================+

+================================================================+
| Storage Network (Example: VLAN 30)                             |
| - NFS traffic (TrueNAS to Workspace VMs)                       |
| - iSCSI traffic (TrueNAS to Proxmox)                           |
| - 10GbE dedicated bandwidth                                    |
| Example Subnet: 10.10.30.x/24 (high-performance routing)       |
+================================================================+

+================================================================+
| Services Network (Example: VLAN 40)                            |
| - Kubernetes service network                                   |
| - Coder agent communication                                    |
| - WebSocket connections                                        |
| Example Subnet: 192.168.40.x/24                                |
+================================================================+
10GbE Backbone:
- All infrastructure components connected via 10 Gigabit Ethernet
- Storage network prioritized with QoS for NFS/iSCSI traffic
- Bonded interfaces on critical nodes for redundancy
- Jumbo frames (MTU 9000) enabled on storage network
Routing and Connectivity:
- Ubiquiti UniFi Network handling inter-VLAN routing
- NAT for workspace internet access
- Firewall rules restrict workspace → management network
- DNS handled by internal DNS server (Pi-hole or similar)
Reliability and Redundancy
Component Redundancy:
| Component | Redundancy Strategy | Recovery Time |
|---|---|---|
| Coder Server | 2 Kubernetes replicas | Instant (load balanced) |
| PostgreSQL | Daily backups + WAL archiving | <5 minutes |
| Proxmox Nodes | 4-node cluster with HA | <2 minutes (VM migration) |
| TrueNAS Storage | Multiple independent servers | Varies by storage tier |
| Network | Bonded 10GbE interfaces | Instant failover |
| Power | Dual PSU + UPS per server | Seconds |
Disaster Recovery Strategy:
- Kubernetes Cluster: etcd snapshots every 6 hours, stored on TrueNAS
- PostgreSQL Database: Daily full backups, point-in-time recovery enabled
- TrueNAS Datasets: ZFS replication to backup TrueNAS (hourly sync)
- Proxmox Configuration: Cluster config backed up weekly
- Workspace VMs: Ephemeral (can be recreated), data persisted on NFS
Backup Infrastructure:
1
2
3
4
Primary Infrastructure → Backup TrueNAS (off-site or isolated)
     ↓                           ↓
ZFS Send/Receive          Encrypted backups
Hourly replication        7-day retention
Monitoring and Observability
Infrastructure Monitoring:
- Prometheus: Metrics collection from Kubernetes, Proxmox, TrueNAS
- Grafana: Dashboards for infrastructure health, workspace usage
- Alertmanager: Notifications for infrastructure issues
- Loki: Log aggregation from all components
Key Metrics Tracked:
- Proxmox node CPU/RAM/disk utilization
- TrueNAS pool capacity and IOPS
- Kubernetes pod health and resource usage
- Workspace VM count and resource allocation
- Network bandwidth usage per VLAN
- NFS mount performance metrics
Scaling Considerations
Current Capacity:
- Concurrent Workspaces: ~40-50 with current resources
- Total Storage: ~28TB across 3 TrueNAS servers
- Network Throughput: 20Gbps+ aggregate (10GbE bonded)
- CPU Allocation: ~80 cores available for workspaces
Expansion Strategy:
- Horizontal: Add Proxmox nodes for more workspace capacity
- Vertical: Upgrade existing nodes (more RAM/CPU)
- Storage: Add TrueNAS servers or expand existing pools
- Network: 25GbE or 40GbE upgrade path available
Why This Architecture?
Separation of Concerns:
- Control Plane (K8s): Orchestration and management
- Compute (Proxmox): Workspace VM execution
- Storage (TrueNAS): Data persistence and quotas
Benefits of Multi-Layer Approach:
- Flexibility: Replace components independently
- Scalability: Scale compute and storage separately
- Reliability: Failure in one layer doesn’t cascade
- Performance: Optimize each layer for its workload
- Cost Efficiency: Use appropriate hardware for each role
This architecture demonstrates that sophisticated cloud-like infrastructure can be built on-premises with careful planning and the right open-source tools.
Authentication and Identity Flow
A critical aspect of the platform is how authentication and identity flow through the entire stack, from initial login to dataset provisioning. Everything is tied together through Authentik SSO - from Coder access to Vault secrets to workspace app links.
SSO with Authentik: The Central Identity Provider:
The platform uses Authentik as the central SSO (Single Sign-On) provider for ALL services:
1
2
3
4
5
6
7
8
9
                    Authentik SSO (Central Identity)
                             ↓
        +==========================================================+
        ↓                    ↓                    ↓
   Coder Login        Vault Access        Workspace Apps
   (Platform)         (Secrets)           (Tools/Services)
        ↓                    ↓                    ↓
  Workspace Create    API Keys Retrieval    One-Click Access
  Dataset Creation    Proxmox Creds         (links in Coder UI)
Complete Authentication Flow:
- User Accesses Coder
- Developer navigates to Coder web UI
- Coder redirects to Authentik SSO login page
- Authentik can integrate with: Google Workspace, Azure AD, Okta, GitHub, etc.
- SSO Authentication
- Developer authenticates via SSO provider (e.g., Google)
- Authentik validates credentials against configured provider
- Authentik issues OAuth/OIDC token with user identity
- Token includes:
username,email,groups,claims
- Coder Session Creation
- Coder receives authentication token from Authentik
- Coder validates token and extracts
username - Coder creates session and associates with username
- Username becomes the primary identity throughout the platform
- Workspace Provisioning
- Developer clicks “Create Workspace” in Coder UI
- Coder passes
usernameto Terraform provisioner - Terraform uses username as variable:
data.coder_workspace.me.owner
- Vault Integration (SSO-Protected)
- Vault also authenticates via Authentik SSO
- Terraform needs Proxmox credentials → Queries Vault
- Vault validates Terraform’s service account via Authentik
- Vault returns Proxmox API credentials for VM provisioning
- Future: User-specific secrets accessible via personal Vault login
- Dynamic Dataset Creation
- Terraform invokes TrueNAS dataset manager script
- Script receives username:
truenas-dataset-manager.sh create ${username} ${quota} - Script creates ZFS dataset:
/mnt/tank/coder-home/${username} - Script sets ZFS quota and creates NFS export
- Workspace VM Configuration
- Cloud-init mounts:
nfs-server:/mnt/tank/coder-home/${username}→/home/${username} - Coder agent connects with user identity
- Workspace becomes accessible
- Cloud-init mounts:
- Workspace App Links
- Coder UI shows clickable links to integrated services
- Click “Open Vault” → Authenticates via same Authentik SSO → Access personal secrets
- Click “Open Grafana” → SSO login → View workspace metrics
- Click “Open Git” → SSO to Forgejo → Access repositories
- All apps use the same SSO identity - no separate logins!
Identity Consistency Across All Services:
| Service | SSO via Authentik | Username Usage |
|---|---|---|
| Coder | ✅ Yes | Primary platform login, workspace owner |
| Vault | ✅ Yes (integrated) | Retrieve Proxmox creds, personal secrets |
| Forgejo | ✅ Yes | Git push/pull, CI/CD access |
| Grafana | ✅ Yes | View personal workspace metrics |
| cliProxy | ✅ Yes | OAuth → API key for AI services |
| TrueNAS | ❌ No (script-based) | Dataset creation via API |
| Proxmox | ✅ Yes (SSO enabled, access controlled) | Admins authenticate via Authentik SSO |
Note: Proxmox is integrated with Authentik SSO for administrator authentication. Workspace users do not have direct access to Proxmox - this demonstrates the power of SSO with proper access control. Authentication is centralized via Authentik, but access is segregated based on roles. Only platform administrators can log into Proxmox; workspace VMs are provisioned automatically via Coder using API credentials stored in Vault.
Workspace App Links: Enhanced Developer Experience:
When you open a workspace in Coder, the UI displays clickable app links:
1
2
3
4
5
6
7
8
9
10
11
12
+==========================================================+
| Workspace: crimson-mite-10                     [Running] |
+==========================================================+
| Apps:                                                    |
|  🖥️  VS Code Desktop      [Open in Browser]              |
|  🤖 Codex AI              [Open Terminal]                |
|  💬 Droid AI             [Chat Interface]                 |
|  🔐 Vault (SSO)          [Open Secrets]                   |
|  📊 Grafana (SSO)        [View Metrics]                   |
|  🔧 Forgejo (SSO)        [Git Repos]                      |
|  📦 S3 Bucket            [Object Storage]                 |
+==========================================================+
How App Links Work:
1
2
3
4
5
6
7
8
9
10
11
12
13
14
15
16
17
18
19
20
21
22
23
24
25
26
27
28
29
# In Coder template - define app links
resource "coder_app" "vault" {
  agent_id     = coder_agent.main.id
  display_name = "Vault (Personal Secrets)"
  url          = "https://vault.example.com"
  icon         = "https://vault.io/favicon.ico"

  # Authentik SSO protects Vault access
  # User clicks link → Redirects to Vault → Authentik SSO → Vault UI
}

resource "coder_app" "grafana" {
  agent_id     = coder_agent.main.id
  display_name = "Workspace Metrics"
  url          = "https://grafana.example.com/d/workspace?var-user=${data.coder_workspace.me.owner}"
  icon         = "https://grafana.com/favicon.ico"

  # Shows metrics for this specific workspace
  # Pre-filtered by username via URL parameter
}

resource "coder_app" "s3_bucket" {
  agent_id     = coder_agent.main.id
  display_name = "S3 Bucket"
  url          = "https://s3-console.example.com/buckets/${data.coder_workspace.me.owner}-workspace"
  icon         = "https://min.io/favicon.ico"

  # Direct link to user's personal S3 bucket
}
Example User Journey:
1
2
3
4
5
6
7
8
9
10
11
12
13
14
15
16
17
18
19
20
21
22
23
24
25
26
27
28
29
30
31
32
33
34
35
36
37
38
39
40
41
42
43
+===================+        +====================+        +==================+
|   Developer       |        |   Authentik SSO    |        |   Coder UI       |
|  john.doe@        |        |  (Identity Hub)    |        |  (Workspace      |
|  company.com      |        |                    |        |   Management)    |
+===================+        +====================+        +==================+
         |                            |                             |
         | 1. Login Request           |                             |
         |===========================>|                             |
         |                            |                             |
         | 2. Authenticate            |                             |
         |    (MFA if enabled)        |                             |
         |<===========================|                             |
         |                            |                             |
         |                            | 3. JWT Token                |
         |                            |============================>|
         |                            |                             |
         |                            |                             | 4. Create Workspace
         |                            |                             |    - Owner: john.doe
         |                            |                             |    - Dataset: /mnt/tank/coder-home/john.doe
         |                            |                             |    - S3: john.doe-workspace
         |                            |                             |
         | 5. Workspace Ready         |                             |
         |<=========================================================|
         |                            |                             |

+================================ Workspace Active ================================+

         | 6. Click [Open Vault]      |                             |
         |===========================>|                             |
         |                            |                             |
         |                            | 7. SSO to Vault             |
         |<===========================|                             |
         |                            |                             |
+===================+        +====================+        +==================+
|     🔐 Vault      |        |  🏗️ Forgejo        |        |  📊 Grafana      |
|  (john.doe's      |        |  (john.doe's       |        |  (john.doe's     |
|   API keys)       |        |   repositories)    |        |   metrics)       |
+===================+        +====================+        +==================+
         ↑                            ↑                             ↑
         |                            |                             |
         +----------------------------+-----------------------------+
                           All authenticated via Authentik SSO
                           All scoped to john.doe's permissions
What happens behind the scenes:
1
2
3
4
5
6
7
8
9
10
11
12
13
# Workspace provisioning flow:
john.doe logs in → Authentik SSO → Coder UI

# Workspace creation:
Owner: john.doe
Dataset: /mnt/tank/coder-home/john.doe (ZFS with 100GB quota)
S3 Bucket: john.doe-workspace (MinIO, auto-created)

# App link clicks use same SSO:
[Open Vault]    → Authentik SSO → Vault UI → john.doe's secrets
[Open Grafana]  → Authentik SSO → Grafana  → john.doe's dashboards
[Open S3]       → Direct link   → S3 Console → john.doe-workspace bucket
[Open Forgejo]  → Authentik SSO → Git repos → john.doe's repositories
Benefits of Unified SSO + App Links:
Security:
- One SSO provider (Authentik) for everything
- MFA enforced at central point
- Revoke access in one place = revoked everywhere
- No credentials stored in workspaces
Developer Experience:
- Single login - authenticate once, access everything
- No context switching - all tools accessible from Coder UI
- Personalized access - app links pre-filtered by username
- Instant access - click link, SSO happens automatically
Operational Excellence:
- Centralized identity - manage users in one place
- Audit trail - all access logged with real identity
- Automation - everything provisioned based on authenticated user
- Compliance - SSO audit logs for all system access
Vault SSO Integration:
Vault’s Authentik SSO integration enables:
1
2
3
4
5
Developer → Vault UI → Authentik SSO → Personal Namespace
                                              ↓
                          Personal Secrets (API keys, passwords)
                          Team Secrets (shared credentials)
                          Workspace Secrets (temporary tokens)
Future Enhancements:
- Workspace-Specific Vault Paths: Each workspace gets own Vault path
- Auto-Injected Secrets: Vault agent injects secrets into workspace
- Dynamic Database Creds: Vault generates temporary DB credentials per workspace
- Certificate Management: Vault issues short-lived TLS certs for workspace services
This creates a truly integrated platform where:
- ✅ Authenticate once via Authentik SSO
- ✅ Username flows through every layer automatically
- ✅ All services accessible via app links in Coder UI
- ✅ No separate logins for Vault, Grafana, Git, S3, etc.
- ✅ Complete audit trail tied to corporate identity
- ✅ Resources (datasets, buckets, secrets) automatically scoped to user
The combination of Authentik SSO, dynamic provisioning, and workspace app links creates an experience that rivals commercial cloud IDEs while maintaining complete control and security.
Architecture Overview
The platform consists of several integrated components working together to provide a seamless development experience.
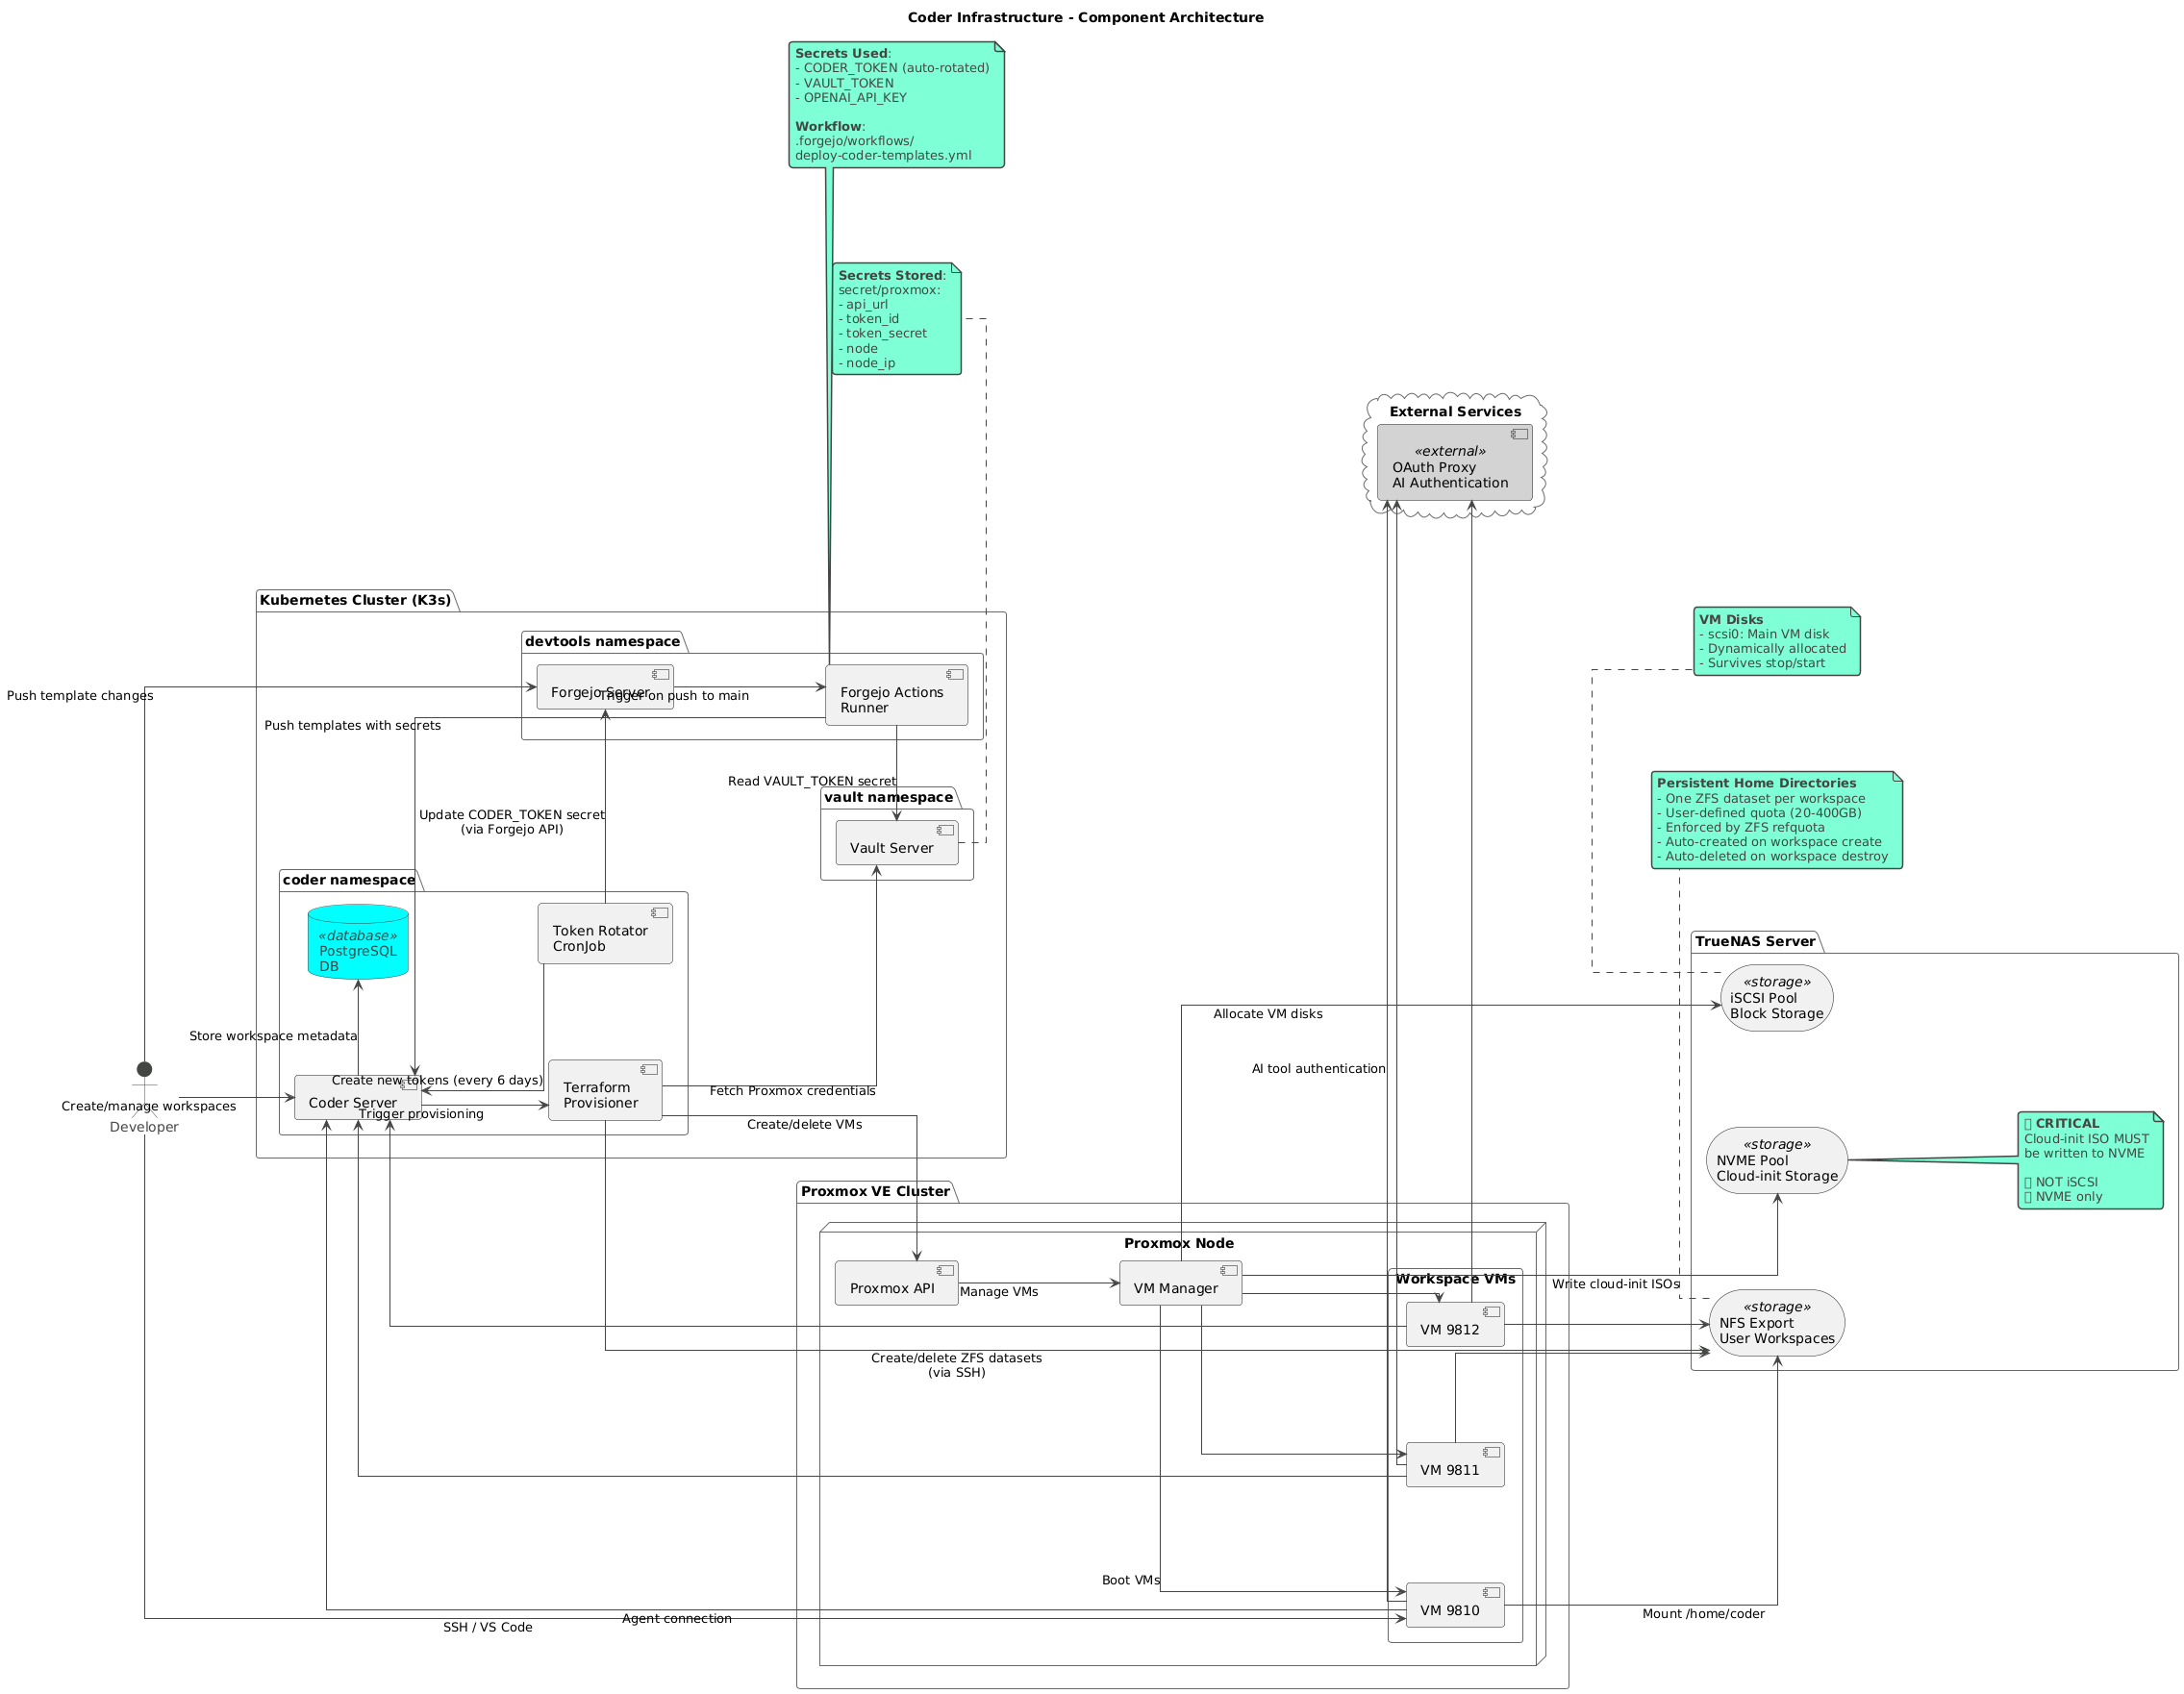
Core Components
Coder Server (Kubernetes)
- Orchestrates workspace lifecycle
- Manages user authentication and authorization
- Provides WebSocket connectivity for agent communication
- Stores workspace metadata in PostgreSQL
Terraform Provisioner
- Provisions infrastructure declaratively
- Integrates with Proxmox for VM creation
- Manages storage via TrueNAS datasets
- Retrieves credentials securely from Vault
Workspace VMs (Proxmox)
- Ubuntu-based development environments
- NFS-mounted persistent home directories
- Customizable via template parameters
- Automatic startup/shutdown based on usage
Storage Backend (TrueNAS)
- ZFS datasets for each user
- NFS exports for workspace access
- Quota management per workspace
- Snapshot-based backups
System Context
The platform integrates with existing homelab services to provide a complete solution:
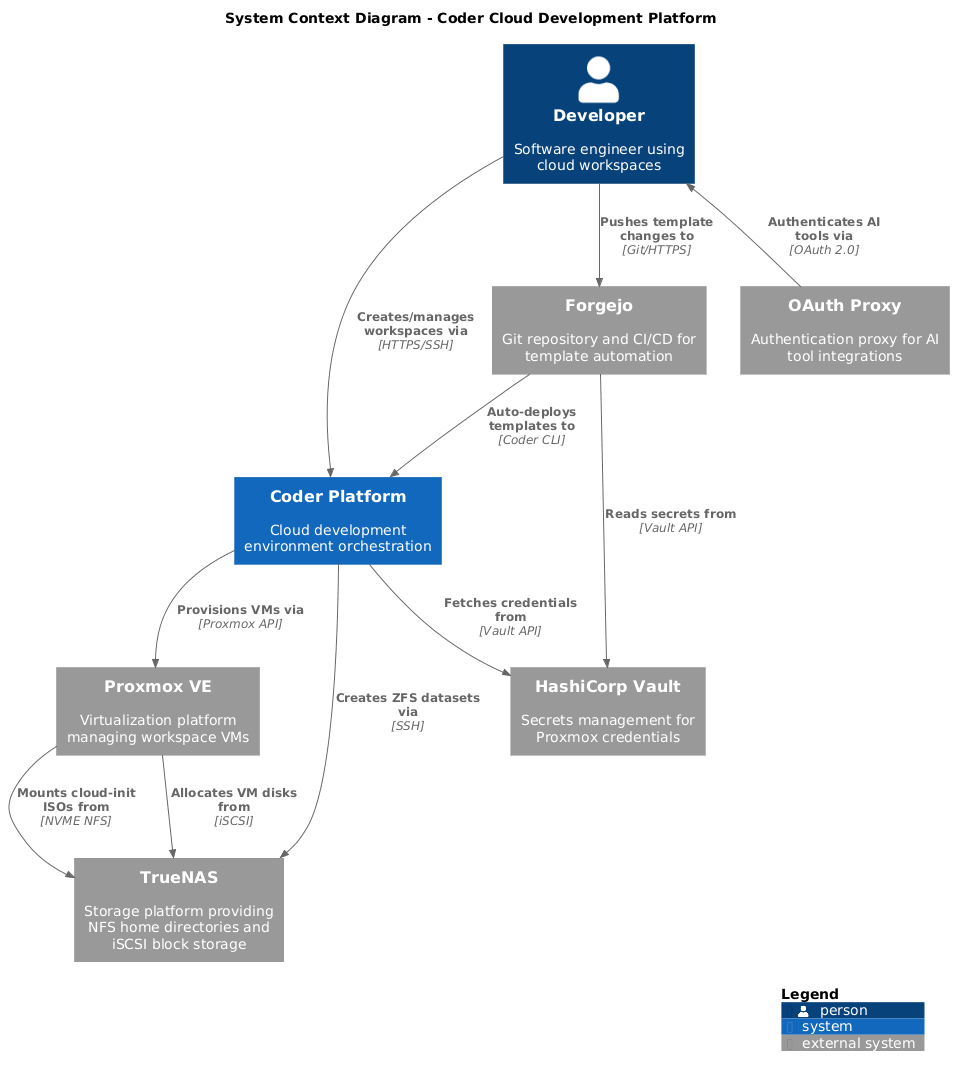
External Integrations
- Proxmox VE: Virtualization platform for workspace VMs
- TrueNAS: Network storage providing persistent home directories
- HashiCorp Vault: Secrets management for infrastructure credentials
- Forgejo: Git repository and CI/CD for template automation
- OAuth Proxy: Authentication for integrated tools
Container Architecture
The Kubernetes deployment provides high availability and scalability:

Kubernetes Components
coder-server
- Main Go application
- Handles API requests and WebSocket connections
- Manages workspace state transitions
postgres
- Stores workspace metadata
- User accounts and permissions
- Template versions and parameters
terraform
- Executes infrastructure provisioning
- Manages workspace resources
- Handles dependency resolution
vault
- Stores Proxmox API credentials
- Provides secure injection
- Rotates credentials automatically
token-rotator (CronJob)
- Rotates Coder API tokens every 6 days
- Updates Forgejo secrets automatically
- Ensures zero-downtime rotation
Workspace Creation Flow
When a developer creates a new workspace, several automated steps occur:
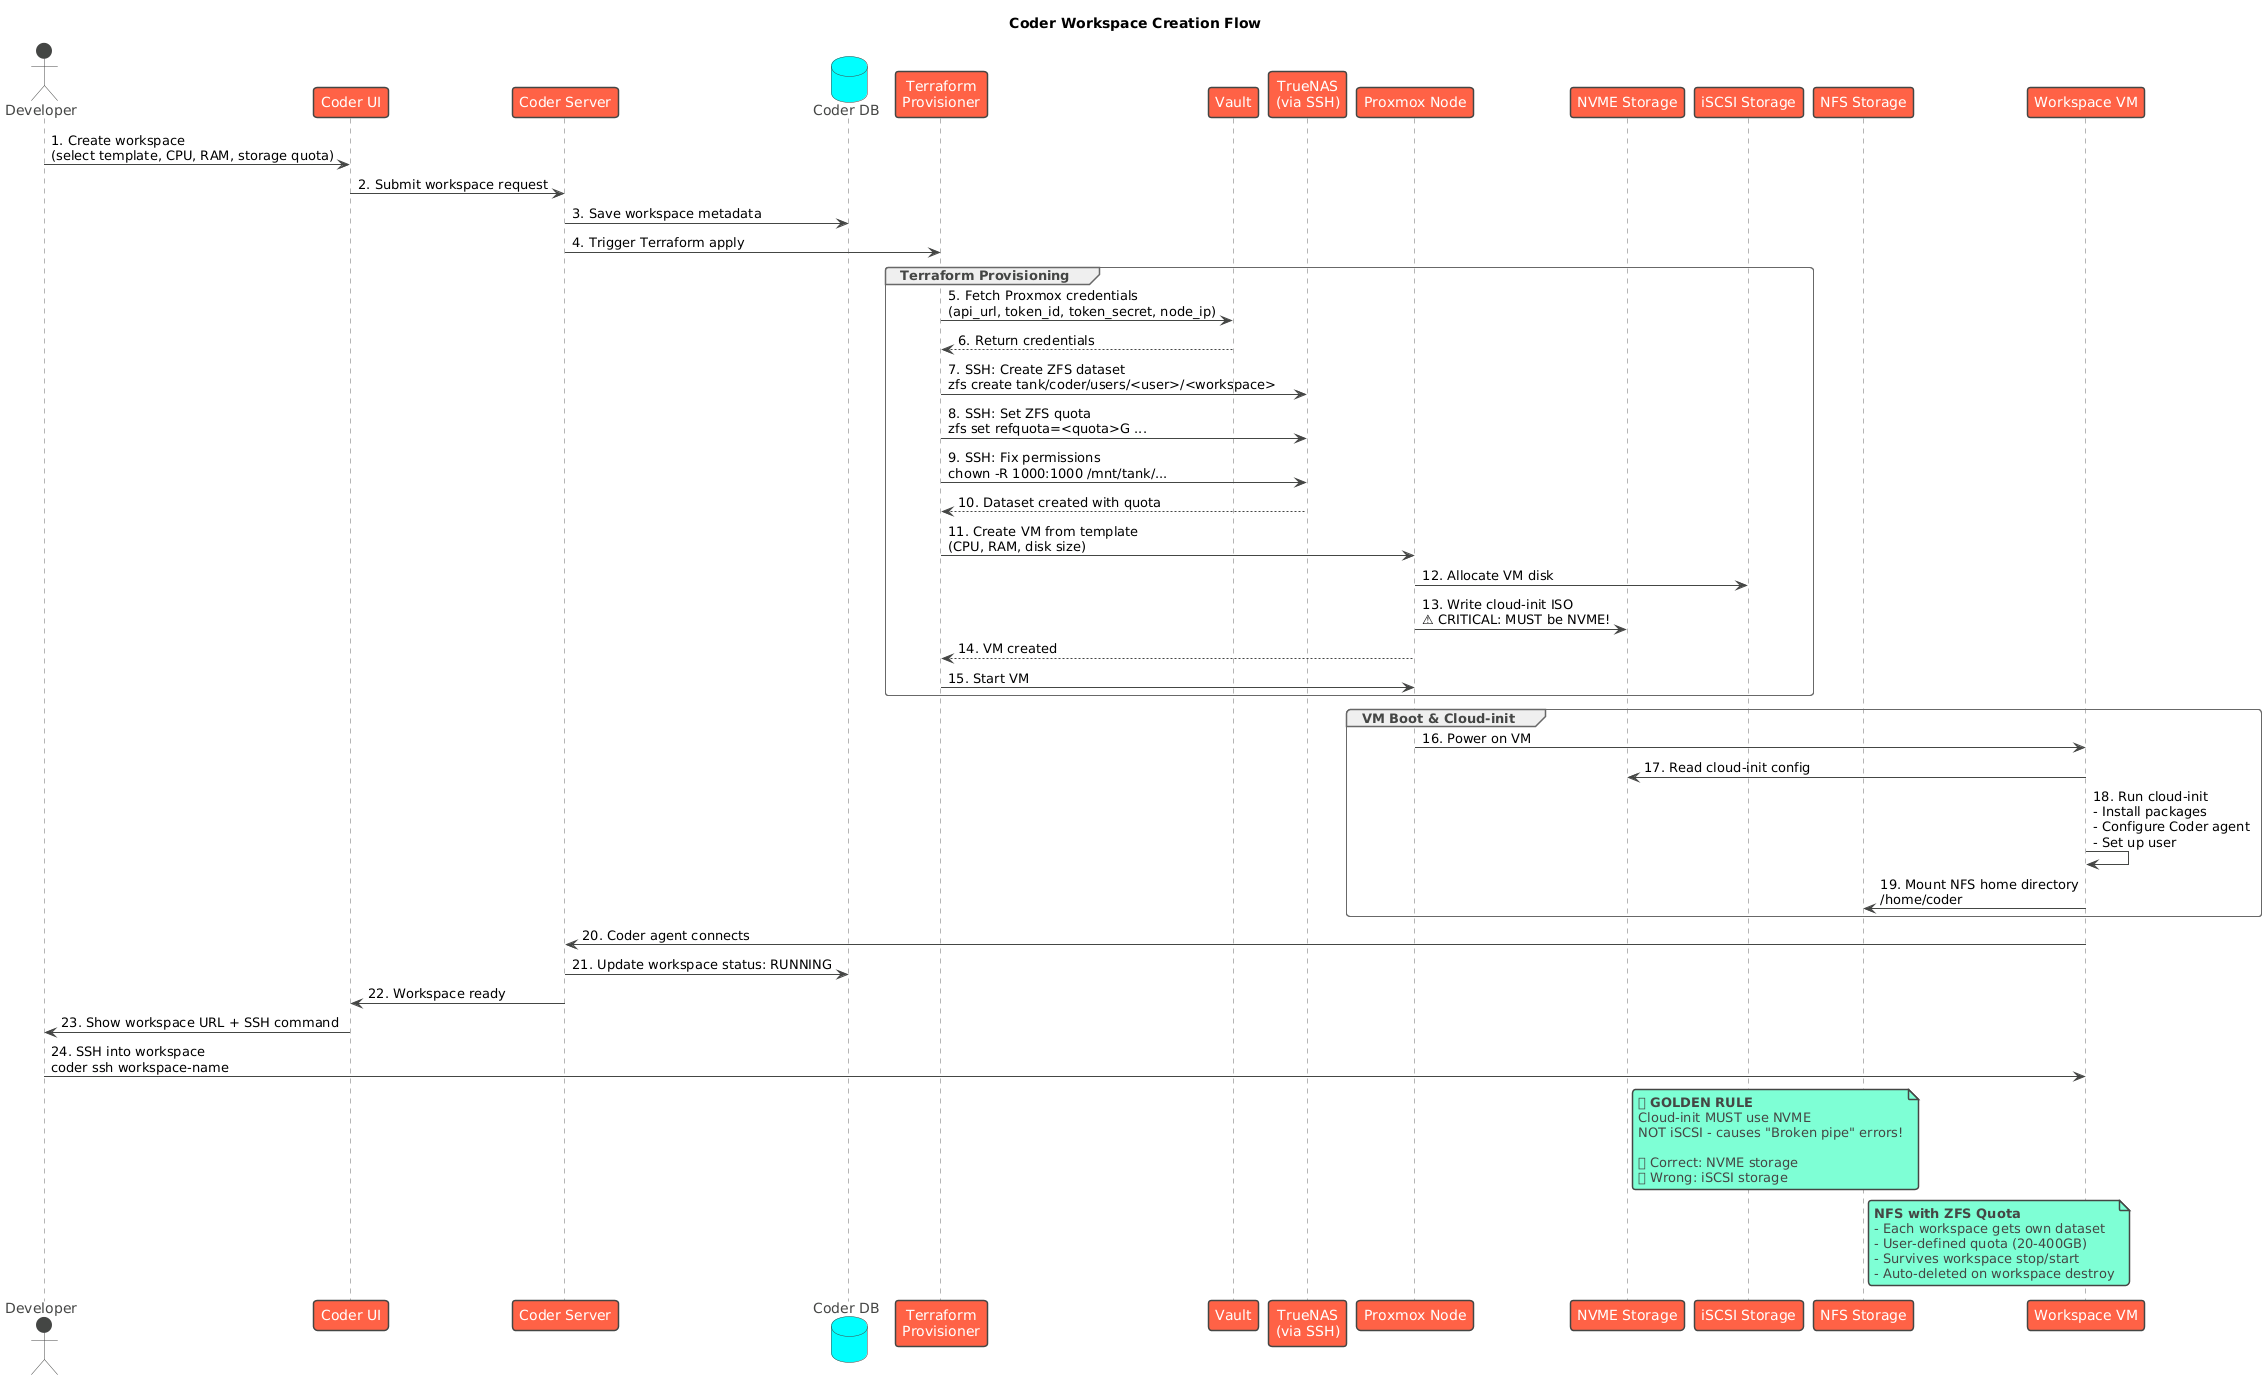
Provisioning Steps
- User Request: Developer selects a template and provides parameters (CPU, RAM, storage)
- Coder Orchestration: Server validates request and initiates Terraform job
- Credential Retrieval: Terraform fetches Proxmox credentials from Vault
- VM Creation: Proxmox provisions virtual machine with specified resources
- Storage Setup: TrueNAS creates ZFS dataset with quota and NFS export
- VM Configuration: Cloud-init configures VM and mounts NFS home directory
- Agent Connection: Coder agent starts and connects via WebSocket
- Ready State: Workspace becomes available for SSH/web IDE access
Template Auto-Deployment
Templates are version-controlled and automatically deployed via Forgejo Actions:
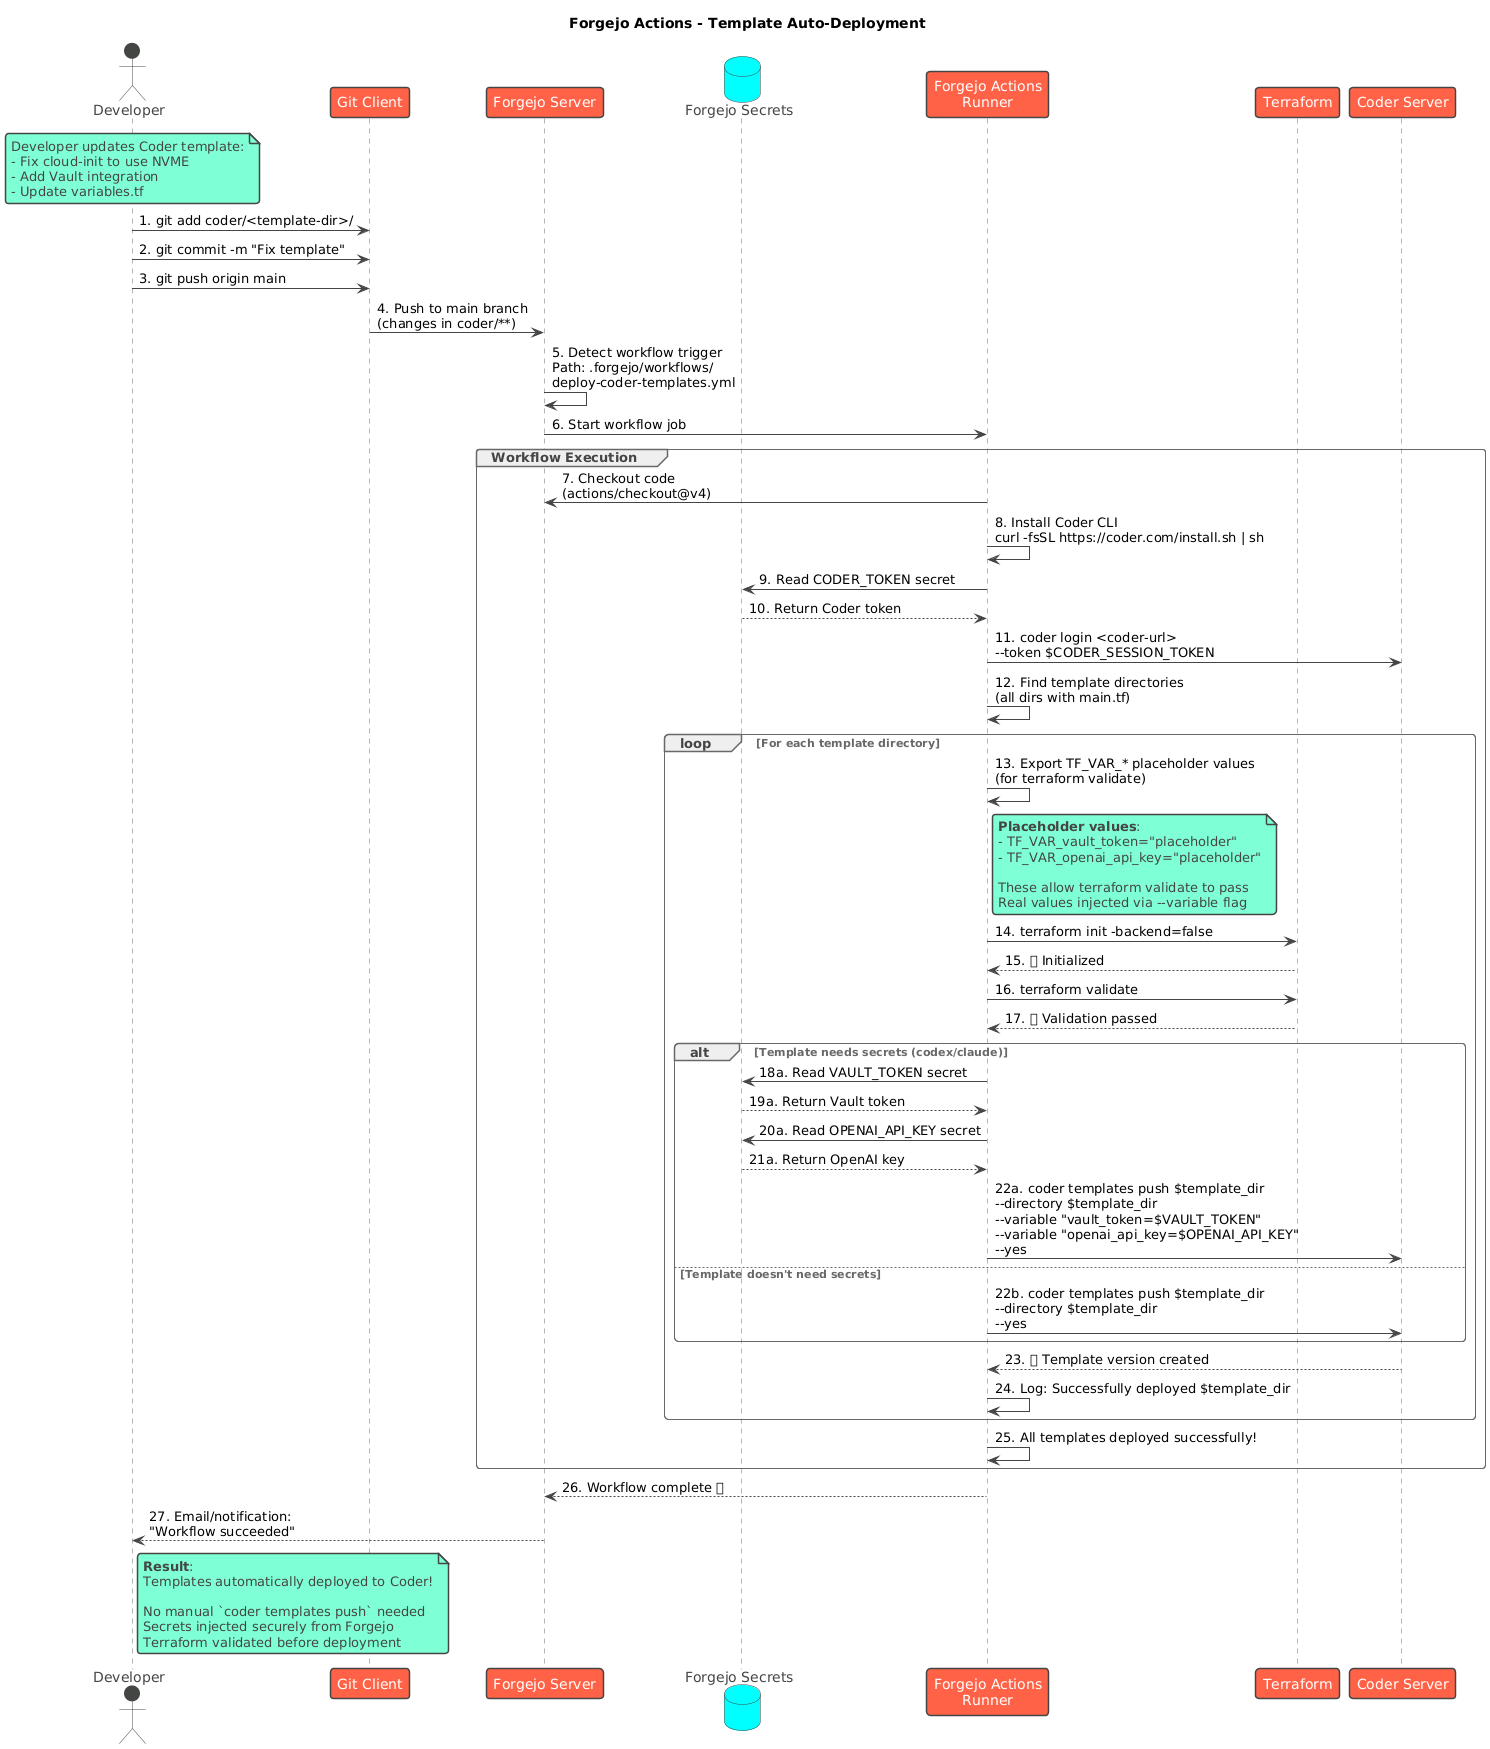
CI/CD Workflow
- Developer Push: Commit template changes to Git repository
- Webhook Trigger: Forgejo detects changes in template directories
- Validation: Terraform validates syntax and configuration
- Secret Injection: Forgejo secrets provide API credentials
- Template Push: Coder CLI deploys new template version
- Notification: Developer receives deployment confirmation
This ensures templates stay synchronized with Git and provides an audit trail for all changes.
Token Rotation
Security is maintained through automated credential rotation:
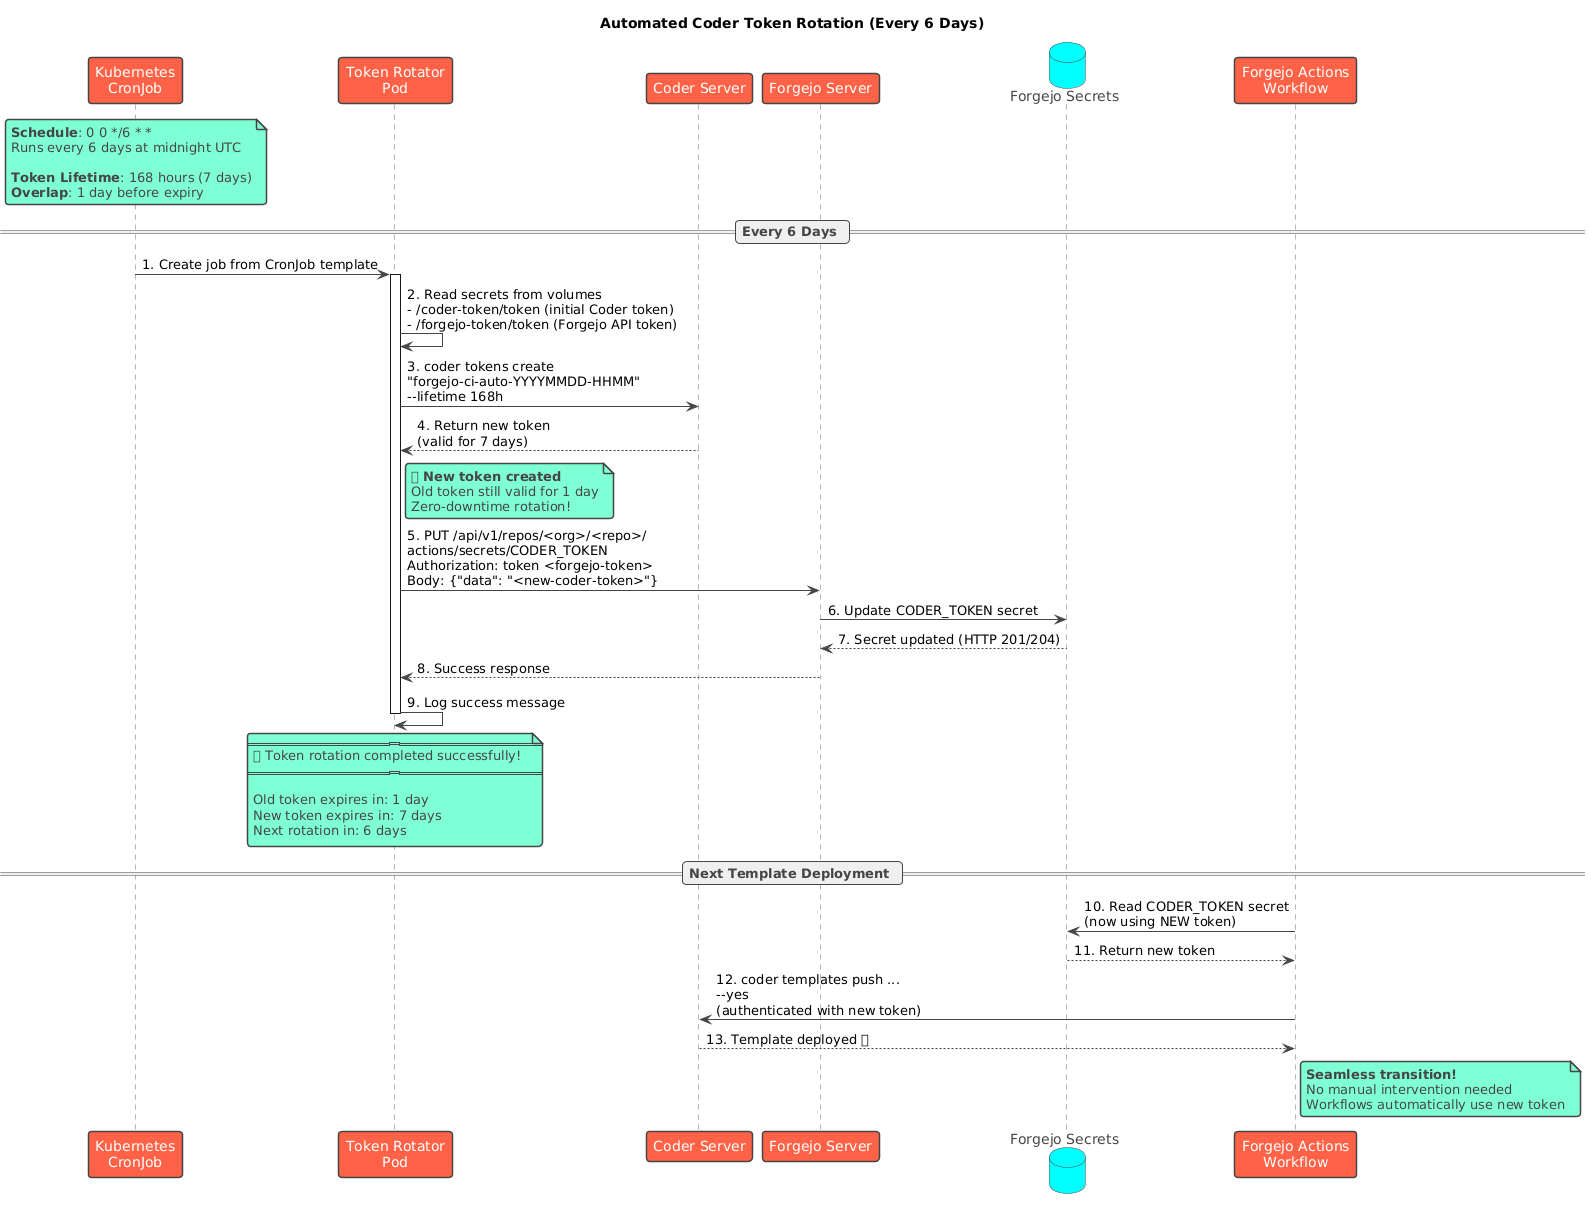
Rotation Process
- Schedule: Kubernetes CronJob runs every 6 days
- Token Creation: Generate new Coder API token with 7-day lifetime
- Secret Update: Update Forgejo repository secrets via API
- Overlap Period: Old token remains valid for 1 day (zero-downtime)
- Next Rotation: Process repeats automatically
This ensures CI/CD pipelines never use expired credentials while maintaining security best practices.
AI Integration: Next-Level Development Experience
One of the most powerful aspects of the Coder platform is its seamless integration with AI-powered development tools. By providing consistent, remote development environments, Coder creates the perfect foundation for integrating advanced AI assistants that enhance developer productivity.
Aider and Claude in Every Workspace
Each workspace comes pre-configured with both Aider and Claude AI integration. This means developers can leverage AI-powered coding assistance directly within their development environment, regardless of their local machine setup.
What makes this powerful:
- Unified Environment: Both Aider and Claude work together in the same workspace
- Consistent Configuration: Every developer gets the same AI tooling setup
- Remote Execution: AI tools run on the workspace VM, not the developers laptop
- Persistent Context: AI assistance maintains context across sessions via NFS-backed storage
Coder Tasks: Clean AI Workflows
Coder provides a feature called Tasks that takes AI integration to the next level. Tasks allow developers to define custom commands and workflows that can be triggered directly from the Coder UI or CLI.
Benefits for AI Workflows:
- Streamlined Commands: Define tasks like “AI Code Review”, “Generate Tests”, “Refactor Module”
- Clean Interface: No need to remember complex CLI arguments or API endpoints
- Team Consistency: Share task definitions across the team via templates
- Audit Trail: All AI-assisted operations logged through Coders audit system
Example Task Definition:
1
2
3
4
5
6
7
8
tasks:
  - name: "AI Code Review"
    command: "aider --review --no-auto-commit"
    description: "Run AI-powered code review on current changes"

  - name: "Generate Unit Tests"
    command: "aider --message Generate comprehensive unit tests for the current module"
    description: "Use AI to generate test coverage"
This transforms AI coding assistance from a manual, ad-hoc process into a structured, repeatable workflow that integrates naturally with the development process.
The Power of Remote AI Integration
Running AI tools on remote workspaces instead of local machines provides significant advantages:
- Compute Flexibility: Scale workspace resources based on AI workload requirements
- Network Optimization: Direct connectivity between workspaces and AI API endpoints
- Credential Management: Centralized API key management through Vault integration
- Cost Control: Track AI API usage per workspace/team
- Consistent Performance: Developers arent limited by local machine capabilities
Implementation Considerations
The AI integration required careful planning and architecture:
- Token Authentication: Implemented proxy-based token authentication for remote AI services
- API Key Rotation: Integrated with Vault for secure, rotating API credentials
- Usage Tracking: Per-workspace metrics for AI API consumption
- Network Routing: Optimized paths for AI API calls to minimize latency
- Error Handling: Graceful degradation when AI services are unavailable
This level of integration required significant thought and engineering effort, but the result is a platform where AI assistance is a first-class feature, not an afterthought.
User Interface: Cloud-Like Experience
The Coder web UI provides an intuitive, cloud-service-like experience for managing workspaces:
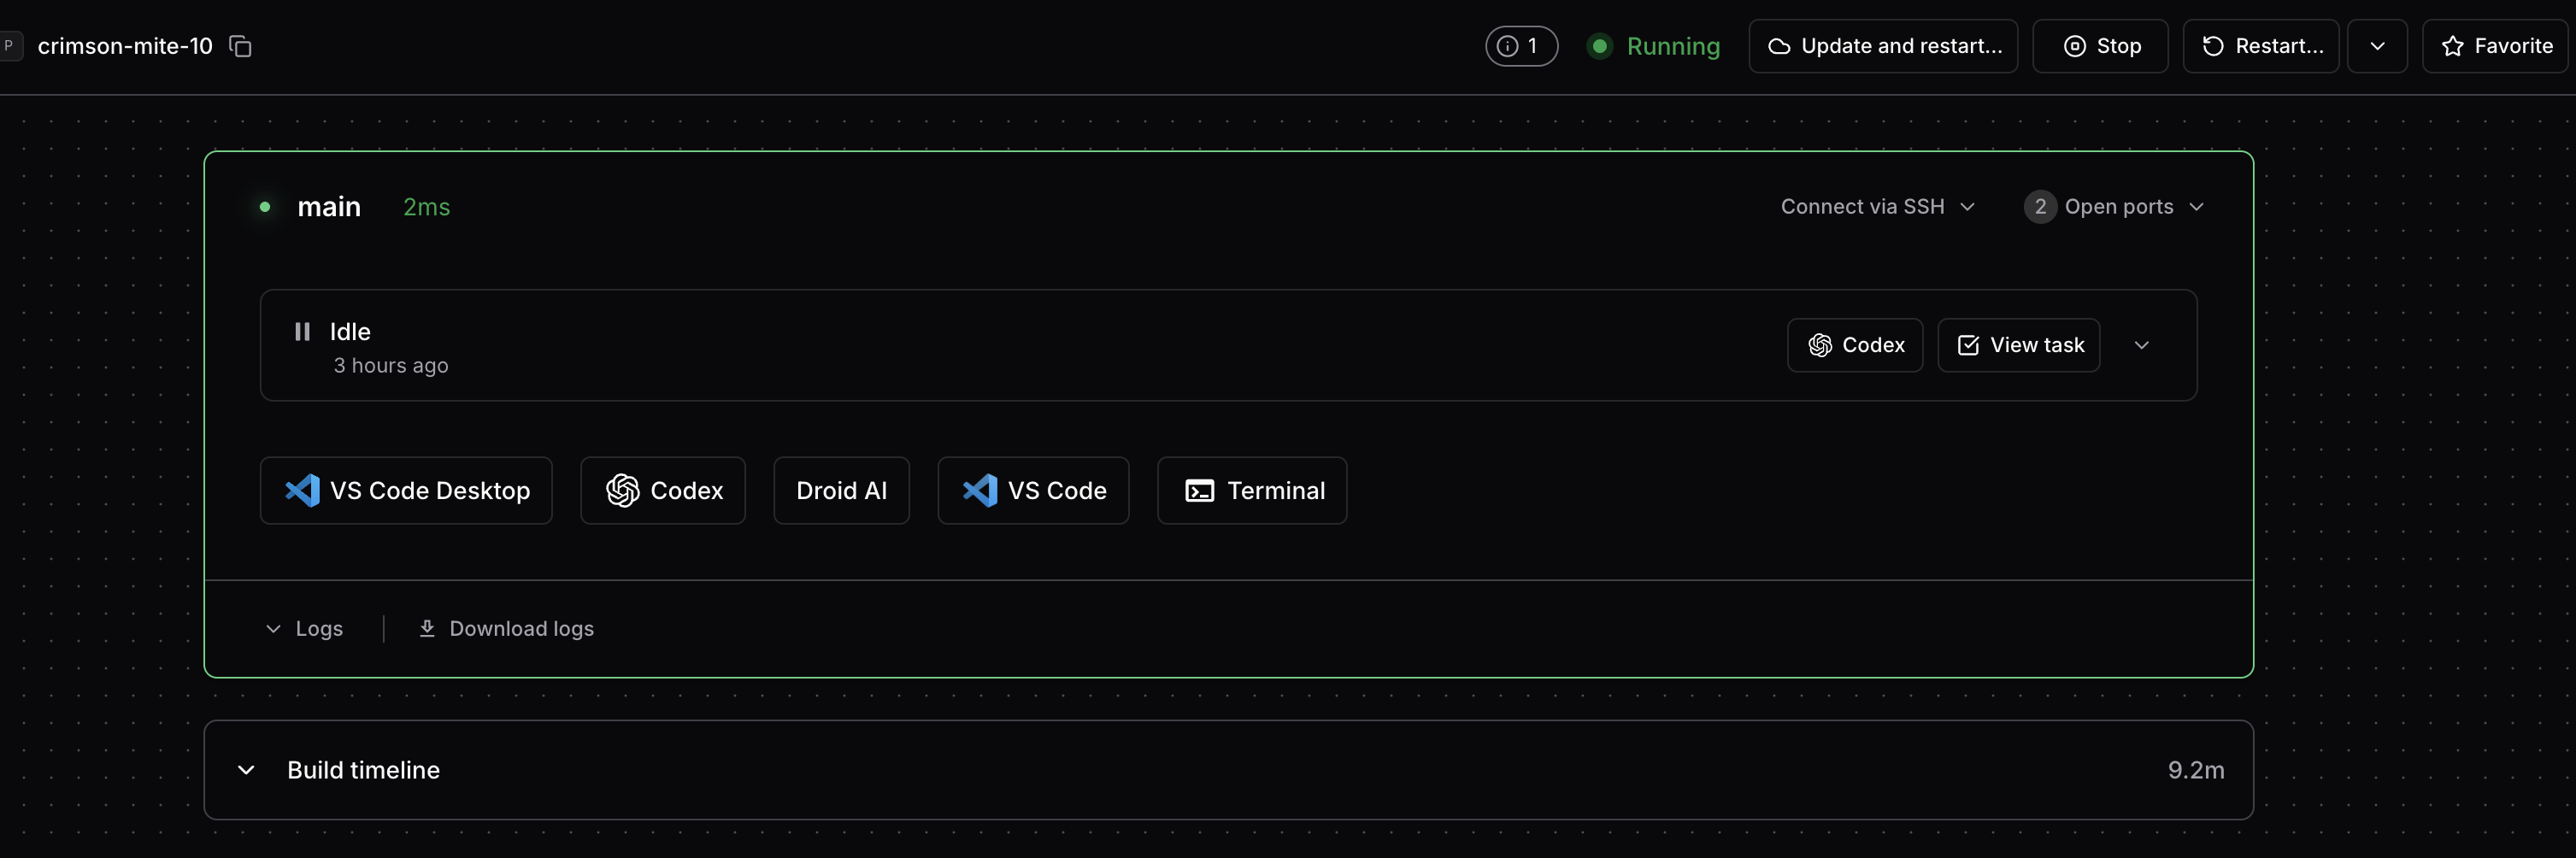 Workspace dashboard showing running workspace with integrated tools: VS Code Desktop, Codex, Droid AI, VS Code, and Terminal - all accessible with one click
Key UI Features:
- Workspace Status: Real-time status indicator (Running, Idle, Starting)
- Connection Method: SSH or web-based access
- Open Ports: Quick access to exposed services
- Integrated Tools: One-click access to development tools and AI assistants
- Build Timeline: Visual feedback on workspace provisioning progress
AI Integration in Action
AI-powered development tools are seamlessly integrated into every workspace:
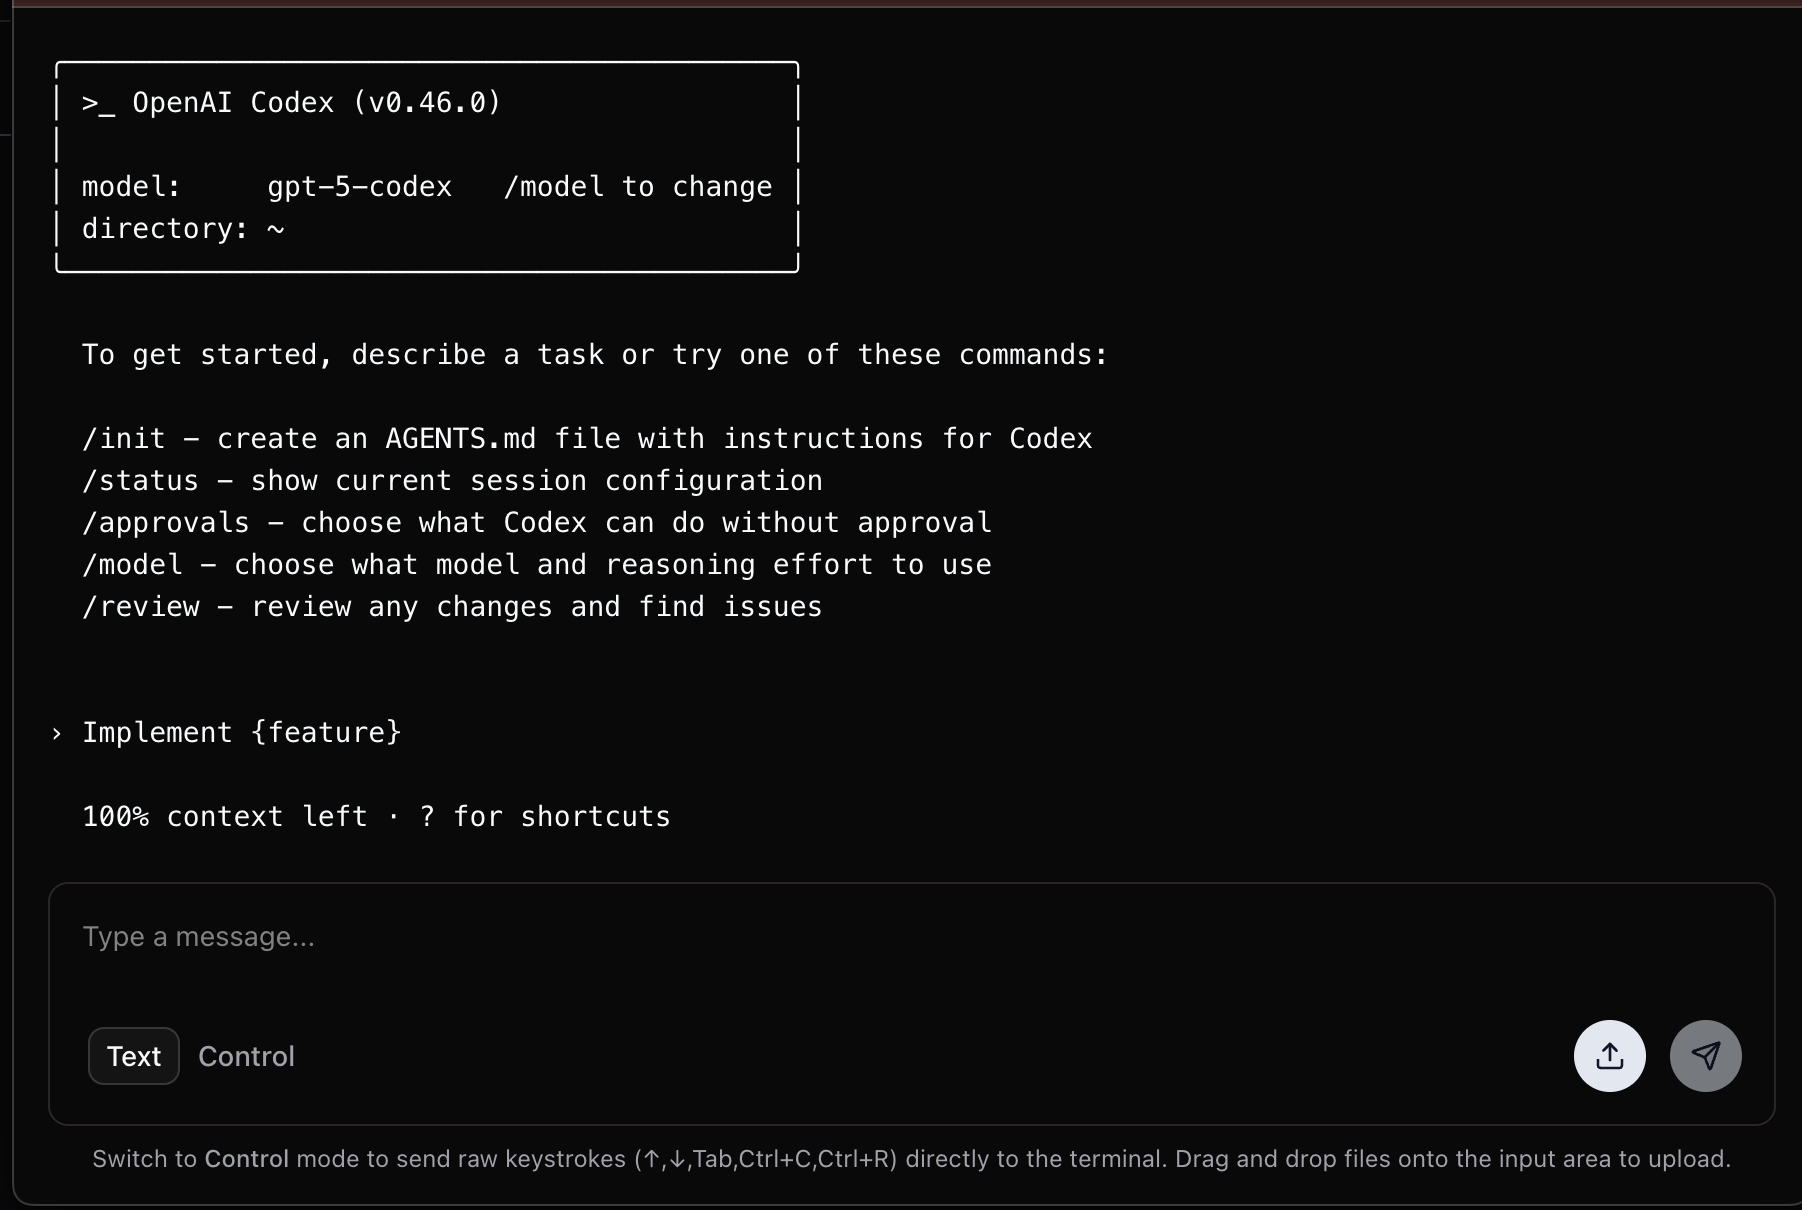 OpenAI Codex running directly in the workspace terminal - ready to assist with code generation, reviews, and implementation tasks
The integration provides:
- Pre-configured AI tools: Codex, Aider, Claude, and Droid AI ready to use
- Context-aware assistance: AI tools have access to your entire codebase
- Multiple interaction modes: Terminal commands, editor integration, and task-based workflows
- Session persistence: AI context maintained across workspace sessions
Parameter Selection: True Self-Service
Template parameters are presented as intuitive sliders and dropdowns, making resource selection feel like using a commercial cloud service:
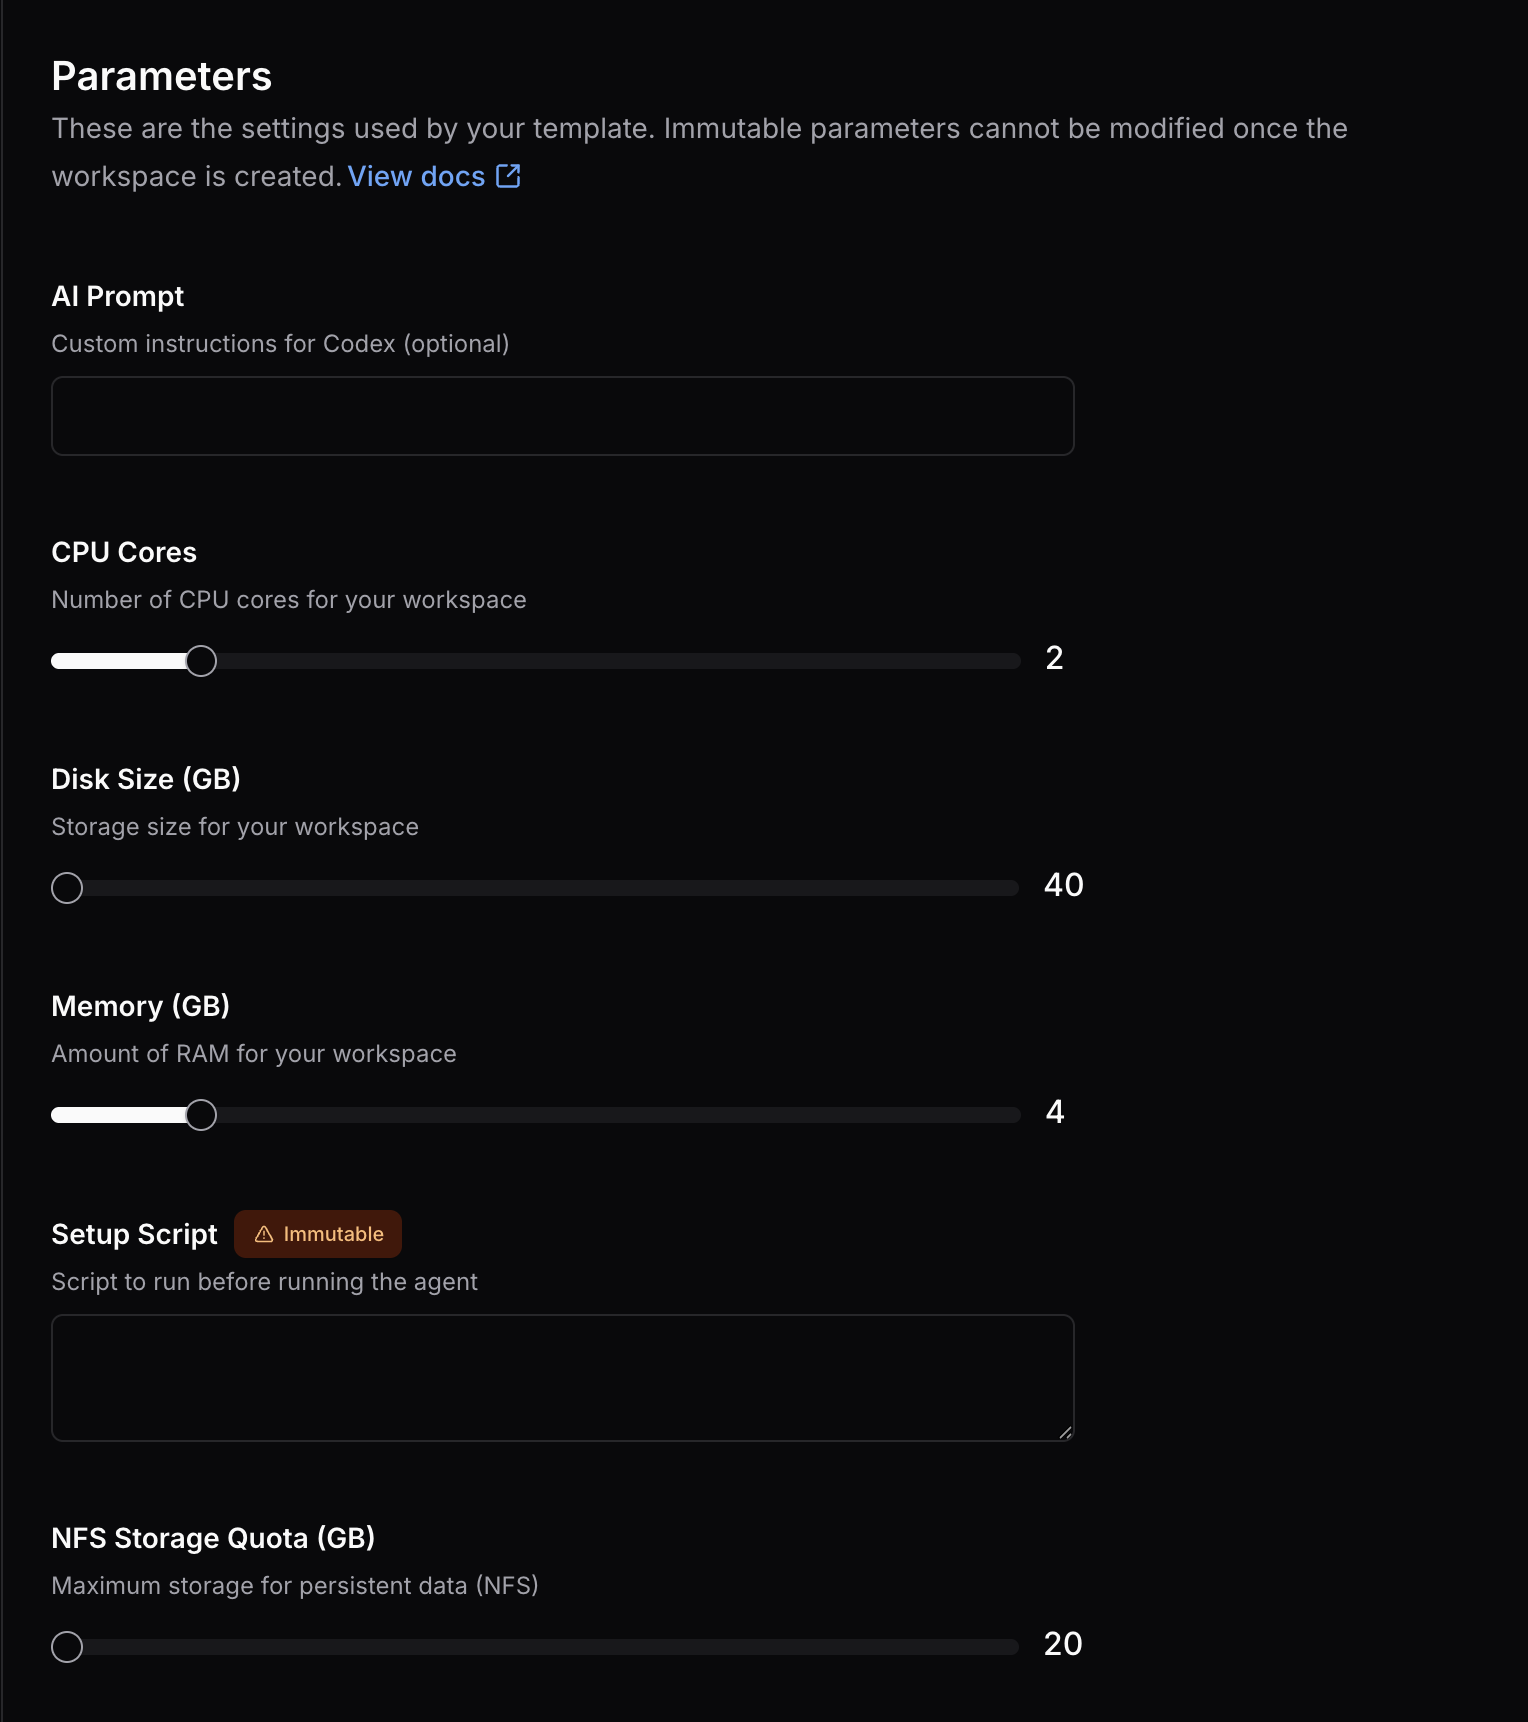 Dynamic sliders for CPU cores, memory, disk size, and NFS storage quota - adjust resources instantly without infrastructure tickets
Parameter UI Features:
- CPU Cores Slider: Visual selection from 2-16 cores with real-time value display
- Memory Slider: Choose RAM from 4GB-64GB based on workload needs
- Disk Size Slider: Allocate workspace disk from 20GB-200GB
- NFS Storage Quota Slider: Set persistent home directory quota from 20GB-500GB
- AI Prompt Field: Optional custom instructions for AI tools (Codex, Aider, etc.)
- Setup Script: Optional initialization script for workspace customization
- Immutable Parameters: Some settings locked after creation (marked with badge)
- Real-time Validation: Prevents invalid configurations before submission
The slider-based interface transforms infrastructure provisioning from a complex request process into an instant, self-service experience - no need to file tickets, wait for approvals, or understand infrastructure details.
MCP Server Architecture: Giving AI Specialized Tools
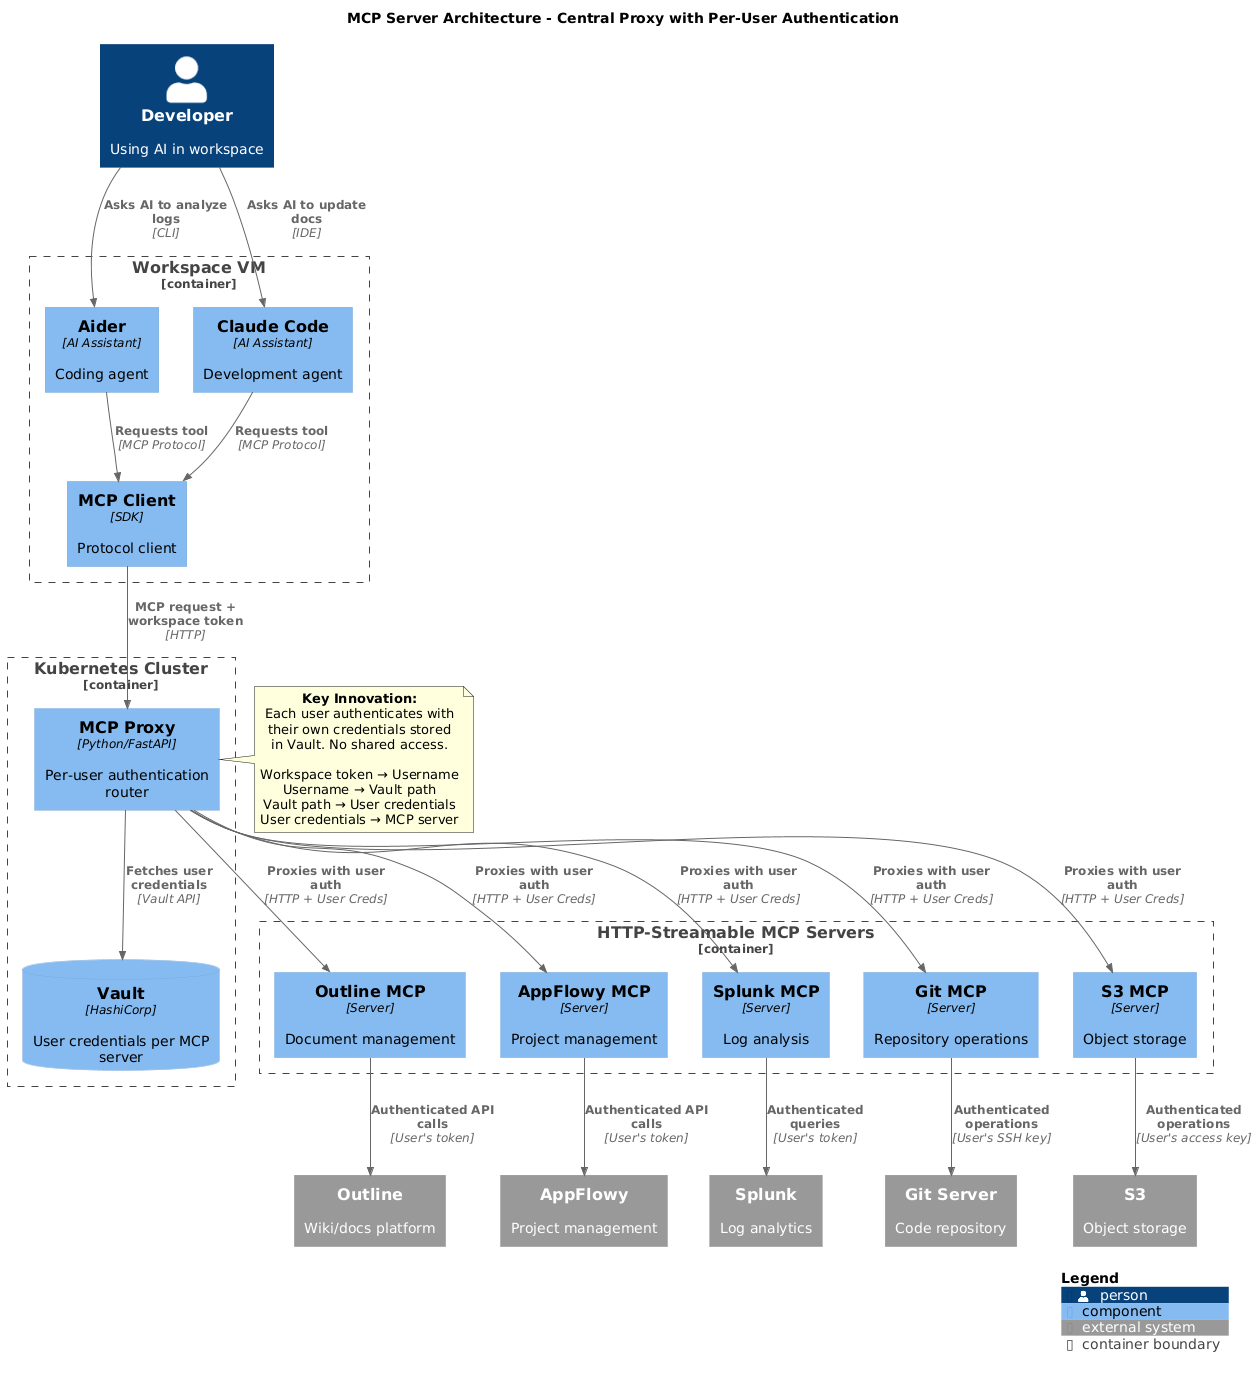 Central MCP Proxy architecture with per-user authentication and HTTP-streamable MCP servers
A revolutionary aspect of the platform is the integration of MCP (Model Context Protocol) servers - a standardized way to give AI models access to external tools, data sources, and services. This transforms AI from a simple chat interface into an intelligent agent that can interact with your entire development infrastructure.
What is MCP?
Model Context Protocol (MCP) is an open standard that allows AI models to:
- Invoke tools and functions (e.g., query databases, call APIs)
- Access data sources (e.g., documentation, code repositories, issue trackers)
- Interact with services (e.g., create documents, manage tasks, deploy code)
- Maintain context across multiple interactions
Think of MCP as giving AI eyes and hands - instead of just generating text, AI can read your documentation, query your databases, interact with your tools, and take actions on your behalf.
MCP Servers in Coder Workspaces
Each workspace can have multiple MCP servers running, each providing different capabilities:
1
2
3
4
5
6
7
8
9
10
11
12
13
14
15
16
17
18
19
20
21
+=============================================================+
| AI Model (Claude, GPT-4, etc.)                              |
| Running in workspace via Aider/Codex                        |
+=============================================================+
                    | MCP Protocol
                    ↓
+=============================================================+
| Central MCP Proxy (Per-User Authentication)                 |
| - Routes requests to appropriate MCP servers                |
| - Validates user OAuth token                                |
| - Injects user credentials per MCP server                   |
+=============================================================+
                    |
      +============+============+============+============+============+
      ↓            ↓            ↓            ↓            ↓
+============+ +============+ +============+ +============+ +============+
|  Outline   | |  AppFlowy  | |   Splunk   | |    Git     | |     S3     |
|    MCP     | |    MCP     | |    MCP     | |    MCP     | |    MCP     |
+============+ +============+ +============+ +============+ +============+
      ↓            ↓            ↓            ↓            ↓
 [User Auth]   [User Auth]   [User Auth]   [User Auth]   [User Auth]
Why HTTP-Streamable MCP Servers?
The platform uses HTTP-streamable MCP servers (not stdio/local MCP servers) for a critical reason: per-user authentication.
The Problem with Traditional MCP:
1
2
3
4
5
❌ Traditional Approach (stdio/local):
- MCP server runs locally with pre-configured credentials
- All users share the same MCP server instance
- Everyone has access to the same data/tools
- Security nightmare: one compromised workspace = everyone's data exposed
The Solution: HTTP-Streamable + Central Proxy:
1
2
3
4
5
6
✅ HTTP-Streamable Approach:
- Each MCP server is a network service (HTTP/SSE)
- Central MCP proxy authenticates each request
- User's OAuth token passed to MCP servers
- Each user accesses only THEIR data via THEIR credentials
- Zero shared access, complete isolation
Central MCP Proxy Architecture
The Central MCP Proxy is the key innovation that makes multi-user MCP deployment secure:
Architecture:
1
2
3
4
5
6
7
8
9
10
11
12
13
14
15
16
17
18
19
20
21
22
23
24
25
26
27
Workspace (User: john.doe)
    ↓
AI Model makes request: "Search my Outline documents for Coder notes"
    ↓
Aider sends MCP request with workspace token
    ↓
+==============================================================+
| Central MCP Proxy                                            |
|                                                              |
| 1. Validate workspace token                                  |
|    → Extract username: john.doe                              |
|                                                              |
| 2. Route to Outline MCP server                               |
|    → HTTP POST to outline-mcp.internal                       |
|                                                              |
| 3. Inject user credentials                                   |
|    → Add header: X-User-Token: john.doe-outline-token        |
|    → Outline MCP uses john.doe's API key from Vault          |
|                                                              |
| 4. Return results to workspace                               |
|    → Stream response back to AI model                        |
+==============================================================+
    ↓
Outline MCP Server
    → Authenticates to Outline API using john.doe's token
    → Returns only documents john.doe has access to
    → AI sees only john.doe's Outline workspace
Security Benefits:
| Aspect | Traditional MCP | HTTP-Streamable + Proxy |
|---|---|---|
| Authentication | Shared credentials | Per-user OAuth tokens |
| Access Control | Everyone sees everything | User sees only their data |
| Audit Trail | No user attribution | Complete per-user logging |
| Revocation | Restart MCP server | Disable user’s OAuth token |
| Isolation | None | Complete workspace isolation |
MCP Server Examples
1. Outline MCP Server
1
2
3
4
5
6
7
8
9
10
11
12
13
14
15
// outline-mcp-server (HTTP-streamable)
// Provides AI access to Outline documentation

Tools provided to AI:
- search_documents(query: string): Search user's Outline docs
- get_document(id: string): Retrieve specific document
- create_document(title: string, content: string): Create new doc
- list_collections(): List user's collections

Example AI interaction:
User: "Search my Outline docs for Coder architecture notes"
AI: [Calls search_documents("Coder architecture")]
MCP Proxy: [Authenticates as john.doe, queries Outline API]
Result: Returns john.doe's Outline documents about Coder
AI: "I found 3 documents about Coder architecture..."
Per-User Authentication:
1
2
3
4
5
6
7
8
9
10
11
12
13
# MCP request includes workspace token
POST /mcp/outline/search
Headers:
  X-Workspace-Token: john.doe:workspace-abc123

# MCP Proxy validates token and looks up Outline API key
john.doe → Vault → outline_api_key_john_doe

# Outline MCP uses john.doe's API key
GET https://outline.example.com/api/documents
Authorization: Bearer john_doe_api_key

# Returns only john.doe's accessible documents
2. AppFlowy MCP Server
1
2
3
4
5
6
7
8
9
10
11
12
13
14
15
16
// appflowy-mcp-server (HTTP-streamable)
// Provides AI access to AppFlowy workspaces (Notion-like)

Tools provided to AI:
- get_workspace(): Get user's AppFlowy workspace
- search_pages(query: string): Search pages and databases
- create_page(title: string): Create new page
- update_database(id: string, data: object): Update database rows
- get_kanban_board(id: string): Get project board

Example AI interaction:
User: "Show me tasks from my sprint board in AppFlowy"
AI: [Calls get_kanban_board("sprint-board")]
MCP Proxy: [Authenticates as john.doe, queries AppFlowy]
Result: Returns john.doe's AppFlowy sprint board data
AI: "You have 5 tasks in progress: 1. Implement auth..."
3. Splunk MCP Server
1
2
3
4
5
6
7
8
9
10
11
12
13
14
15
// splunk-mcp-server (HTTP-streamable)
// Provides AI access to Splunk data and searches

Tools provided to AI:
- search(query: string, timerange: string): Run SPL search
- get_saved_searches(): List user's saved searches
- get_dashboards(): List accessible dashboards
- create_alert(query: string, conditions: object): Create alert

Example AI interaction:
User: "Show me error rate for my app in the last hour"
AI: [Calls search("index=main app=myapp error | stats count", "1h")]
MCP Proxy: [Authenticates as john.doe with Splunk token]
Result: Returns Splunk search results john.doe can access
AI: "Your app had 47 errors in the last hour, mostly 500s..."
4. Git MCP Server (Forgejo)
1
2
3
4
5
6
7
8
9
10
11
12
13
14
15
16
// git-mcp-server (HTTP-streamable)
// Provides AI access to Git repositories

Tools provided to AI:
- list_repos(): List user's repositories
- search_code(query: string): Search code across repos
- get_file(repo: string, path: string): Get file contents
- create_pr(repo: string, title: string, branch: string): Create PR
- list_issues(repo: string): List issues

Example AI interaction:
User: "Find all TODO comments in my coder-templates repo"
AI: [Calls search_code("TODO", repo="coder-templates")]
MCP Proxy: [Authenticates as john.doe to Forgejo]
Result: Returns TODO comments from john.doe's repo
AI: "Found 12 TODO comments across 5 files..."
5. S3 MCP Server
1
2
3
4
5
6
7
8
9
10
11
12
13
14
15
16
// s3-mcp-server (HTTP-streamable)
// Provides AI access to S3 object storage

Tools provided to AI:
- list_buckets(): List user's buckets
- list_objects(bucket: string): List objects in bucket
- upload_file(bucket: string, path: string, content: string): Upload
- download_file(bucket: string, path: string): Download
- create_presigned_url(bucket: string, path: string): Get shareable URL

Example AI interaction:
User: "Upload this diagram to my workspace S3 bucket"
AI: [Calls upload_file("john-doe-workspace", "diagrams/arch.png", data)]
MCP Proxy: [Authenticates as john.doe, gets S3 credentials]
Result: File uploaded to john.doe's personal bucket
AI: "Diagram uploaded successfully to your workspace bucket"
Automated MCP Server Deployment
MCP servers are deployed and managed automatically via scripts:
Deployment Script:
1
2
3
4
5
6
7
8
9
10
11
12
13
14
15
16
17
18
19
20
21
22
23
24
25
26
27
28
29
30
#!/bin/bash
# deploy-mcp-servers.sh
# Automatically deploy MCP servers to Kubernetes

MCP_SERVERS=(
    "outline-mcp"
    "appflowy-mcp"
    "splunk-mcp"
    "git-mcp"
    "s3-mcp"
)

for server in "${MCP_SERVERS[@]}"; do
    echo "Deploying $server..."

    # Build container image
    docker build -t mcp-registry.local/$server:latest ./mcp-servers/$server

    # Push to internal registry
    docker push mcp-registry.local/$server:latest

    # Deploy to Kubernetes
    kubectl apply -f ./k8s-manifests/$server-deployment.yaml

    # Update MCP Proxy routing configuration
    kubectl exec -n coder mcp-proxy-0 -- \
        mcp-proxy-ctl add-route $server http://$server.mcp-namespace.svc.cluster.local:8080
done

echo "All MCP servers deployed!"
Kubernetes Deployment Example:
1
2
3
4
5
6
7
8
9
10
11
12
13
14
15
16
17
18
19
20
21
22
23
24
25
26
27
28
29
30
31
32
33
34
35
36
37
38
39
40
41
# outline-mcp-deployment.yaml
apiVersion: apps/v1
kind: Deployment
metadata:
  name: outline-mcp
  namespace: mcp-servers
spec:
  replicas: 2  # HA for reliability
  selector:
    matchLabels:
      app: outline-mcp
  template:
    metadata:
      labels:
        app: outline-mcp
    spec:
      containers:
      - name: outline-mcp
        image: mcp-registry.local/outline-mcp:latest
        ports:
        - containerPort: 8080
          name: http
        env:
        - name: VAULT_ADDR
          value: "http://vault.vault.svc.cluster.local:8200"
        - name: MCP_MODE
          value: "http-streamable"  # Not stdio!
---
apiVersion: v1
kind: Service
metadata:
  name: outline-mcp
  namespace: mcp-servers
spec:
  selector:
    app: outline-mcp
  ports:
  - port: 8080
    targetPort: 8080
    name: http
  type: ClusterIP
Central MCP Proxy Configuration
MCP Proxy Routing Table:
1
2
3
4
5
6
7
8
9
10
11
12
13
14
15
16
17
18
19
20
21
22
23
24
25
26
27
28
# mcp-proxy-config.yaml
routes:
  - name: outline
    upstream: http://outline-mcp.mcp-servers.svc.cluster.local:8080
    auth:
      type: oauth-vault
      vault_path: secret/mcp/outline/{username}

  - name: appflowy
    upstream: http://appflowy-mcp.mcp-servers.svc.cluster.local:8080
    auth:
      type: oauth-vault
      vault_path: secret/mcp/appflowy/{username}

  - name: splunk
    upstream: http://splunk-mcp.mcp-servers.svc.cluster.local:8080
    auth:
      type: oauth-vault
      vault_path: secret/mcp/splunk/{username}

  - name: git
    upstream: http://git-mcp.mcp-servers.svc.cluster.local:8080
    auth:
      type: oauth-vault
      vault_path: secret/mcp/git/{username}

# Proxy validates workspace token via Coder API
coder_api_url: https://coder.example.com/api/v2
MCP Proxy Request Flow:
1
2
3
4
5
6
7
8
9
10
11
12
13
14
15
16
17
18
19
20
21
22
23
24
25
26
27
28
29
30
# Simplified MCP Proxy logic
async def handle_mcp_request(request):
    # 1. Extract workspace token from request
    workspace_token = request.headers.get("X-Workspace-Token")

    # 2. Validate token with Coder API
    username = await coder_api.validate_token(workspace_token)
    if not username:
        return {"error": "Invalid workspace token"}

    # 3. Extract MCP server name from request path
    mcp_server = request.path.split("/")[2]  # /mcp/outline/search

    # 4. Get user's credentials for this MCP server from Vault
    vault_path = f"secret/mcp/{mcp_server}/{username}"
    user_creds = await vault.read(vault_path)

    # 5. Forward request to MCP server with user credentials
    upstream_url = mcp_routes[mcp_server]["upstream"]
    response = await http.post(
        url=upstream_url + request.path,
        headers={
            "X-User-Credentials": user_creds,
            "X-Username": username,
        },
        json=request.json
    )

    # 6. Stream response back to workspace
    return response
MCP Server Configuration in Workspace
Aider Configuration:
1
2
3
4
5
6
7
8
9
10
11
12
13
14
15
16
17
18
19
20
21
22
23
# ~/.aider/mcp.yaml in workspace
# AI tools automatically discover and use these MCP servers

mcp_servers:
  outline:
    url: https://mcp-proxy.example.com/mcp/outline
    auth: workspace_token  # Automatically injected by Coder agent

  appflowy:
    url: https://mcp-proxy.example.com/mcp/appflowy
    auth: workspace_token

  splunk:
    url: https://mcp-proxy.example.com/mcp/splunk
    auth: workspace_token

  git:
    url: https://mcp-proxy.example.com/mcp/git
    auth: workspace_token

  s3:
    url: https://mcp-proxy.example.com/mcp/s3
    auth: workspace_token
Automatically configured by Terraform template:
1
2
3
4
5
6
7
8
9
10
11
12
13
14
15
16
17
18
19
20
21
22
23
24
25
26
27
28
resource "coder_agent" "main" {
  # ... other config ...

  startup_script = <<-EOT
    # Configure MCP servers for AI tools
    mkdir -p ~/.aider
    cat > ~/.aider/mcp.yaml <<EOF
    mcp_servers:
      outline:
        url: ${var.mcp_proxy_url}/mcp/outline
        auth: $CODER_AGENT_TOKEN
      appflowy:
        url: ${var.mcp_proxy_url}/mcp/appflowy
        auth: $CODER_AGENT_TOKEN
      splunk:
        url: ${var.mcp_proxy_url}/mcp/splunk
        auth: $CODER_AGENT_TOKEN
      git:
        url: ${var.mcp_proxy_url}/mcp/git
        auth: $CODER_AGENT_TOKEN
      s3:
        url: ${var.mcp_proxy_url}/mcp/s3
        auth: $CODER_AGENT_TOKEN
    EOF

    # AI tools now have access to all MCP servers with user's credentials
  EOT
}
Benefits of This Architecture
Security:
- ✅ Per-user authentication for all MCP servers
- ✅ No shared credentials across users
- ✅ Complete workspace isolation
- ✅ Credentials stored securely in Vault
- ✅ OAuth token revocation disables all MCP access
Developer Experience:
- ✅ AI can access user’s actual data (Outline docs, Splunk searches, etc.)
- ✅ No manual configuration - MCP servers auto-configured in workspace
- ✅ Seamless integration - AI tools discover servers automatically
- ✅ Rich tooling - AI has access to documentation, databases, APIs
Operational Excellence:
- ✅ Centralized deployment - all MCP servers in Kubernetes
- ✅ Automated updates - push new MCP servers via script
- ✅ High availability - MCP servers run with multiple replicas
- ✅ Audit trail - all MCP requests logged with username
Scalability:
- ✅ Add new MCP servers easily - just deploy and update proxy config
- ✅ Horizontal scaling - add more MCP proxy instances as needed
- ✅ Per-user rate limiting - prevent abuse
- ✅ Caching - frequently accessed data cached per user
Real-World Use Case: AI-Powered Development Workflow
Scenario: Developer working on a feature, using AI with full MCP integration
1
2
3
4
5
6
7
8
9
10
11
12
13
14
15
16
17
18
19
20
21
22
23
24
25
26
27
28
29
30
31
32
33
34
35
36
37
38
39
40
41
42
43
44
45
46
47
48
49
50
51
52
53
54
55
56
57
58
59
60
61
62
+==================+                          +==========================+
|   Developer      |                          |    AI Assistant          |
|   (Workspace)    |                          |    (with MCP Access)     |
+==================+                          +==========================+
         |                                                |
         | "Help me implement                             |
         | user authentication"                          |
         |===============================================>|
         |                                                |
         |                                                | [1] Search Outline MCP
         |                                                |     📚 Docs
         |                                                |     ↓
         |                                                | "Found: Authentik OIDC guide"
         |                                                |
         |                                                | [2] Search Git MCP
         |                                                |     🔍 Code
         |                                                |     ↓
         |                                                | "Found: auth.go in user-service"
         |                                                |
         |                                                | [3] Query Splunk MCP
         |                                                |     📊 Logs
         |                                                |     ↓
         |                                                | "23 auth failures: invalid_grant"
         |                                                |
         |                                                | [4] Check AppFlowy MCP
         |                                                |     📋 Tasks
         |                                                |     ↓
         |                                                | "Task assigned to you, due Friday"
         |                                                |
         | Response with full context:                    |
         | - Documentation reference                      |
         | - Code examples                                |
         | - Error analysis                               |
         | - Task deadline                                |
         |<===============================================|
         |                                                |
         | "Create PR for my                              |
         | auth implementation"                          |
         |===============================================>|
         |                                                |
         |                                                | [5] Git MCP: Create PR
         |                                                |     ✅ PR #47 opened
         |                                                |
         |                                                | [6] AppFlowy MCP: Update task
         |                                                |     ✅ Moved to "In Review"
         |                                                |
         |                                                | [7] S3 MCP: Upload diagram
         |                                                |     ✅ auth-flow-diagram.png
         |                                                |
         | ✅ PR created, task updated, diagram uploaded  |
         |<===============================================|
         |                                                |

+=====================================================================================+
|                              MCP Server Access                                      |
|                                                                                     |
|  📚 Outline MCP     🔍 Git MCP     📊 Splunk MCP     📋 AppFlowy MCP     💾 S3 MCP  |
|     (Docs)           (Code)          (Logs)            (Tasks)           (Files)   |
|                                                                                     |
|  All authenticated as the developer                                                 |
|  All scoped to developer's permissions                                              |
+=====================================================================================+
This is AI-augmented development done right - the AI has access to your documentation, code, logs, tasks, and tools. Authentication is handled through proper RBAC (Role-Based Access Control):
- AI Service Identity: For Git operations, CI/CD, and external integrations, the AI uses its own service account identity with scoped permissions (configured through Authentik/Vault)
- User Context: For workspace operations like editing files or running commands, the AI operates in your workspace context but actions are auditable
- RBAC Enforcement: Authentik provides fine-grained permission control - you can restrict what AI service accounts can access
- Production Security: In production deployments, AI service accounts have limited, least-privilege access - no full user permissions
- Audit Trail: All AI actions are logged with service account attribution, not masked as user actions
Example: When AI commits to Git, it uses a dedicated “ai-assistant” service account, not your personal credentials. When AI updates Plane tasks, it can use your identity (with your approval) or a service account depending on RBAC policy.
Future MCP Server Integrations
Planned MCP Servers:
- Plane MCP: Open source project management - create/update issues, epics, and sprints
- Mattermost MCP: Team messaging and collaboration (planned)
- Database MCP: Query PostgreSQL/MySQL with user’s DB credentials
- Kubernetes MCP: View pods, logs, deployments for user’s namespaces
- Terraform MCP: Read state, plan infrastructure changes
- Monitoring MCP: Query Prometheus/Grafana with user-scoped metrics
The MCP server architecture transforms AI from a code generator into an intelligent development assistant that can interact with your entire development infrastructure, all while maintaining strict per-user authentication and security.
Data Persistence: The NFS Architecture That Changes Everything
The Problem with Ephemeral VMs
By default, Coder treats workspace VMs as ephemeral - when you stop, restart, or rebuild a workspace, the VM is destroyed and recreated from scratch. This is fantastic for ensuring clean, reproducible environments, but it creates a critical challenge: where does your data go?
Traditional solutions involve:
- Local VM storage: Lost on every rebuild
- Git repositories: Only code, not your entire development environment
- Manual backups: Time-consuming and error-prone
For a production-grade developer platform, we needed something better: true persistence that survives VM destruction while maintaining the clean-slate benefits of ephemeral infrastructure.
The Solution: External NFS + ZFS Dataset Lifecycle Management
The breakthrough came from separating compute (ephemeral VMs) from storage (persistent NFS mounts). Here’s how it works:
1
2
3
4
5
6
7
8
9
10
11
12
13
14
15
16
17
18
19
20
21
22
23
24
25
26
27
28
29
30
31
32
33
34
35
36
37
38
39
40
41
42
43
┌─────────────────────────────────────────────────────────────────┐
│                    Workspace Lifecycle                          │
├─────────────────────────────────────────────────────────────────┤
│                                                                 │
│  Workspace Created:                                             │
│  ┌─────────────────────────────────────────────────────────┐   │
│  │ 1. Terraform: Run truenas-dataset-manager.sh create    │   │
│  │    → Creates ZFS dataset: tank/coder/users/john/ws1    │   │
│  │    → Sets quota: 100GB (user-configurable)             │   │
│  │    → Creates NFS share for dataset                     │   │
│  │    → Sets ownership: uid 1000, gid 1000                │   │
│  │                                                         │   │
│  │ 2. Proxmox: Provision VM from template                 │   │
│  │    → CPU: 4 cores (slider: 1-8)                        │   │
│  │    → RAM: 8GB (slider: 2-32GB)                         │   │
│  │    → Disk: 40GB local (slider: 20-100GB)               │   │
│  │                                                         │   │
│  │ 3. Cloud-init: Mount NFS on first boot                 │   │
│  │    → mount 192.168.x.x:/mnt/tank/coder/users/john/ws1  │   │
│  │    →      /home/${username}                                  │   │
│  │    → All user data now on persistent NFS              │   │
│  └─────────────────────────────────────────────────────────┘   │
│                                                                 │
│  Workspace Stopped/Started/Rebuilt:                            │
│  ┌─────────────────────────────────────────────────────────┐   │
│  │ VM Destroyed → Recreated from template                 │   │
│  │ NFS Dataset: UNTOUCHED - still exists on TrueNAS      │   │
│  │ On boot: Re-mounts same NFS share                     │   │
│  │ Result: All files, configs, history preserved         │   │
│  └─────────────────────────────────────────────────────────┘   │
│                                                                 │
│  Workspace DELETED:                                             │
│  ┌─────────────────────────────────────────────────────────┐   │
│  │ 1. Terraform destroy triggers:                          │   │
│  │    → truenas-dataset-manager.sh delete john ws1        │   │
│  │    → Finds NFS share by path, deletes it              │   │
│  │    → Runs: zfs destroy -r tank/coder/users/john/ws1   │   │
│  │    → Dataset and all data permanently removed          │   │
│  │                                                         │   │
│  │ 2. VM deleted from Proxmox                             │   │
│  └─────────────────────────────────────────────────────────┘   │
│                                                                 │
└─────────────────────────────────────────────────────────────────┘
The Magic Script: truenas-dataset-manager.sh
This Bash script is the heart of the persistence architecture. It manages the complete lifecycle of ZFS datasets and NFS shares through a clever SSH routing pattern:
Coder Server (K3s) → Proxmox Host → TrueNAS
The script provides four operations:
1. Create Dataset with Quota
1
2
3
4
5
6
7
8
9
10
/usr/local/bin/coder-scripts/truenas-dataset-manager.sh create john workspace-1 100

# What happens:
# 1. SSH to Proxmox (192.168.x.x)
# 2. From Proxmox, SSH to TrueNAS (192.168.x.x)
# 3. Create ZFS dataset: zfs create -p tank/coder/users/john/workspace-1
# 4. Set quota: zfs set refquota=100G tank/coder/users/john/workspace-1
# 5. Set ownership: chown -R 1000:1000 /mnt/tank/coder/users/john/workspace-1
# 6. Create NFS share via TrueNAS midclt API
# 7. Return to Coder, continue provisioning
2. Delete Dataset (Workspace Deletion Only)
1
2
3
4
5
6
7
8
/usr/local/bin/coder-scripts/truenas-dataset-manager.sh delete john workspace-1

# What happens:
# 1. SSH to Proxmox → TrueNAS
# 2. Find NFS share ID by path using midclt query
# 3. Delete NFS share: midclt call sharing.nfs.delete <id>
# 4. Destroy dataset: zfs destroy -r tank/coder/users/john/workspace-1
# 5. All user data for this workspace permanently removed
3. Update Quota (User Adjusts Slider)
1
2
3
4
/usr/local/bin/coder-scripts/truenas-dataset-manager.sh update-quota john workspace-1 200

# User increased storage from 100GB to 200GB
# ZFS immediately applies new quota without downtime
4. Check Quota (Monitoring)
1
2
3
4
5
6
/usr/local/bin/coder-scripts/truenas-dataset-manager.sh check-quota john workspace-1

# Returns:
# tank/coder/users/john/workspace-1  refquota  200G
# tank/coder/users/john/workspace-1  used      45.3G
# tank/coder/users/john/workspace-1  available 154.7G
Terraform Integration: The Critical Lifecycle Hooks
In each Coder template (main.tf), the dataset lifecycle is managed with Terraform’s null_resource and provisioners:
1
2
3
4
5
6
7
8
9
10
11
12
13
14
15
16
17
18
19
20
21
22
23
24
25
26
27
resource "null_resource" "nfs_dataset" {
  # CREATE: Run when workspace is created or quota changes
  provisioner "local-exec" {
    command = "/usr/local/bin/coder-scripts/truenas-dataset-manager.sh create ${data.coder_workspace_owner.me.name} ${data.coder_workspace.me.name} ${data.coder_parameter.storage_quota.value}"
  }

  # DELETE: Run ONLY when workspace is destroyed (not stopped!)
  provisioner "local-exec" {
    when    = destroy
    command = "/usr/local/bin/coder-scripts/truenas-dataset-manager.sh delete ${self.triggers.username} ${self.triggers.workspace_name} || true"
  }

  # Triggers: Recreate if these values change
  triggers = {
    workspace_name = data.coder_workspace.me.name
    username       = data.coder_workspace_owner.me.name
    storage_quota  = data.coder_parameter.storage_quota.value
  }
}

# VM must wait for NFS dataset to be ready
resource "proxmox_virtual_environment_vm" "workspace" {
  depends_on = [null_resource.nfs_dataset]

  # VM configuration...
  # On boot, cloud-init mounts the NFS share
}
Key Design Decision: The when = destroy provisioner only runs on workspace deletion, not on stop/start/rebuild. This means:
✅ Stop workspace: VM deleted, NFS dataset untouched ✅ Start workspace: New VM created, mounts existing NFS dataset, all data intact ✅ Rebuild workspace: Old VM deleted, new VM created, mounts existing NFS, data preserved ✅ Delete workspace: VM deleted, THEN NFS dataset deleted permanently
Why This Architecture is Brilliant
- True Persistence: Your entire
/home/${username}directory survives any VM operation except deletion - Clean Rebuilds: Destroy and recreate VMs freely without worrying about data loss
- Per-User Isolation: Each workspace gets its own ZFS dataset with quota enforcement
- Storage Flexibility: Users can adjust quotas with a slider (10GB to 500GB)
- ZFS Benefits:
- Compression: Automatic LZ4 compression saves space
- Snapshots: TrueNAS can snapshot datasets for backup/rollback
- Deduplication: Optional dedup across users
- Quota Enforcement: Hard limits prevent one user filling the pool
- Secure Deletion: When a workspace is deleted, ALL data is destroyed - no orphaned datasets
- Network Independence: NFS mount works across any Proxmox node
Real-World Example: Developer Workflow
1
2
3
4
5
6
7
8
9
10
11
12
13
14
15
16
17
18
19
20
21
22
23
24
25
26
27
28
29
30
31
32
# Day 1: Create workspace
coder create my-project --template proxmox-vm-codex
# → ZFS dataset created: tank/coder/users/john/my-project (100GB)
# → VM created and mounts NFS
# → Install tools, clone repos, configure environment

# Day 2: Stop workspace to save resources
coder stop my-project
# → VM destroyed
# → NFS dataset untouched

# Day 3: Start workspace
coder start my-project
# → New VM created from template
# → Mounts existing NFS dataset
# → All files, configs, Docker containers still there!

# Week 2: Need more storage
# Open Coder UI → Rebuild workspace → Adjust slider: 100GB → 200GB
# → Terraform detects trigger change
# → Runs: truenas-dataset-manager.sh update-quota john my-project 200
# → ZFS immediately applies new quota
# → VM rebuilt with more storage capacity

# Month 3: Project complete, delete workspace
coder delete my-project
# → VM destroyed
# → Terraform destroy provisioner triggered
# → truenas-dataset-manager.sh delete john my-project
# → NFS share removed
# → ZFS dataset destroyed
# → All data permanently deleted
The Multi-Hop SSH Pattern
One fascinating aspect of this architecture is how it works around network topology. The Coder server (running in K3s) cannot directly SSH to TrueNAS due to network segmentation. The solution:
1
2
3
4
5
6
7
8
┌──────────────┐         ┌──────────────┐         ┌──────────────┐
│ Coder Server │ ──SSH──→│ Proxmox Host │ ──SSH──→│   TrueNAS    │
│   (K3s Pod)  │         │ 192.168.x.x │         │ 192.168.x.x  │
└──────────────┘         └──────────────┘         └──────────────┘
      ↓                         ↓                         ↓
  Executes              Has SSH access to           Manages ZFS
  Terraform             TrueNAS (management         datasets & NFS
  templates             network access)             shares
The script uses nested SSH commands:
1
ssh [email protected] "ssh [email protected] 'zfs create -p tank/coder/users/john/ws1'"
This pattern works because:
- Coder server has SSH keys for Proxmox
- Proxmox has SSH keys for TrueNAS
- All authentication is key-based (no passwords)
- Commands execute seamlessly across the chain
Security and Permissions
ZFS Dataset Ownership:
1
chown -R 1000:1000 /mnt/tank/coder/users/john/workspace-1
- UID 1000 =
coderuser in workspace VMs - GID 1000 =
codergroup - Only the
coderuser can write to their dataset
NFS Mount Options:
1
mount -t nfs -o vers=4,rw,sync 192.168.x.x:/mnt/tank/coder/users/john/workspace-1 /home/${username}
- NFSv4 for better performance and security
rw: Read-write accesssync: Immediate writes to storage (no cache risk)
Network ACLs:
1
2
3
4
5
{
  "networks": ["192.168.x.0/24"],
  "maproot_user": "nobody",
  "maproot_group": "nogroup"
}
- VLAN Segmentation: Only the workspace VLAN (e.g.,
192.168.20.0/24) can mount - tighter security than entire/16range - Root Squashing:
maproot_user: nobodyprevents root access from NFS clients (security best practice) - Least Privilege: NFS clients cannot gain root privileges on the NAS
- Network Isolation: Storage network traffic isolated to specific VLAN
- No Public NFS Exposure: NFS shares never exposed to public internet
- No public NFS exposure
Performance Considerations
Why NFS over iSCSI?
- NFS: File-level protocol, perfect for home directories
- iSCSI: Block-level protocol, overkill for developer workspaces
- NFS advantages:
- No complex multipath setup
- Works seamlessly across Proxmox nodes
- Easy backup (TrueNAS snapshots)
- Simpler quota management
Network Performance:
- TrueNAS connected via 10GbE to Proxmox cluster
- NFS over TCP for reliability
- ZFS ARC (Adaptive Replacement Cache) on TrueNAS provides excellent read performance
- Developer workloads are not I/O intensive enough to saturate NFS
Monitoring and Observability
Dataset Usage Tracking:
1
2
3
4
5
6
7
# Check all user datasets
zfs list -r tank/coder/users -o name,used,refquota,avail

NAME                                  USED  REFQUOTA  AVAIL
tank/coder/users/john/workspace-1     45G      100G    55G
tank/coder/users/jane/dev-env         23G       50G    27G
tank/coder/users/bob/test-cluster    156G      200G    44G
Grafana Dashboards (via Prometheus + node-exporter on TrueNAS):
- Per-workspace storage consumption
- Quota utilization trends
- NFS mount status per workspace
- Dataset growth rate alerts
This data feeds back into Coder’s UI via custom scripts, allowing developers to see their storage usage directly in the workspace dashboard.
Why This Matters
This persistence architecture is the foundation that makes Coder viable for production use. Without it, developers would:
- Lose work on every rebuild
- Fear VM maintenance
- Store everything in Git (even databases, configs, etc.)
- Need manual backup strategies
With this architecture, developers get:
- Confidence: Stop/start/rebuild freely without fear
- Flexibility: Adjust resources without data loss
- Isolation: Per-workspace storage quotas
- Clean Slate: Delete workspace = clean deletion, no orphaned data
- Enterprise-Grade: Same patterns used by cloud providers (EBS, Persistent Disks, etc.)
The beauty is that it’s 100% open source - ZFS, NFS, Terraform, Bash - no proprietary magic, just solid engineering.
Why Coder is Awesome - And How We Extended It
The Coder Foundation: Cloud Development Environments Done Right
Coder is an open source platform for creating cloud development environments (CDEs). Think GitHub Codespaces or Gitpod, but self-hosted, infinitely customizable, and free.
At its core, Coder provides:
- Templates: Infrastructure-as-code for workspaces (Terraform/OpenTofu)
- Control Plane: API for managing workspace lifecycle
- Agents: Lightweight processes running in workspaces for connection and monitoring
- Web UI: Dashboard for developers to create, manage, and access workspaces
But what makes Coder truly exceptional for power users is its extensibility. Every feature I needed that wasn’t built-in could be added through Terraform resources, custom agents, and Coder’s API.
Port Forwarding: Develop Web Apps Like They’re Local (But Better)
One of Coder’s most powerful features is built-in port forwarding with web proxy URLs. This is NOT the basic VS Code port forwarding - this is production-grade proxying through Coder’s control plane.
When you’re developing a web application in your workspace:
1
2
3
# In workspace terminal
npm run dev
# Server running on port 3000
In Coder’s UI, you immediately see:
1
2
🌐 Port 3000 [Access via Web]
   https://workspace-name--3000.coder.example.com
Two ways to access your app:
1. Web Proxy (Recommended - Works Everywhere)
Coder generates a unique URL for each port:
1
2
3
https://john-workspace-1--3000.coder.example.com
https://john-workspace-1--8080.coder.example.com
https://jane-dev-env--5000.coder.example.com
How it works:
- Coder agent detects listening ports inside workspace
- Agent reports ports to Coder control plane via WebSocket
- Coder UI displays detected ports with clickable proxy URLs
- Click the URL → opens in browser → proxied through Coder control plane
- Traffic flow:
Browser → Coder HTTPS → Workspace port
Benefits:
- ✅ Works from anywhere - no VPN needed (if Coder is public)
- ✅ HTTPS by default - secure connections via Coder’s SSL
- ✅ No local port conflicts - everything goes through web URLs
- ✅ Shareable URLs - send link to teammates (with auth)
- ✅ Persistent URLs - same URL across workspace restarts
2. Local Port Forwarding (Optional - VS Code Style)
For tools that need localhost:3000 (like mobile dev):
1
coder port-forward workspace-name --tcp 3000:3000
This creates an SSH tunnel to your desktop’s localhost - but web proxy is the primary method.
Real-world example:
1
2
3
4
5
6
7
8
9
10
11
# Backend API in workspace
cd backend && npm run dev  # Port 8080
# Access: https://my-workspace--8080.coder.example.com

# Frontend in workspace
cd frontend && npm run dev  # Port 3000
# Access: https://my-workspace--3000.coder.example.com

# Database UI in workspace
docker run -p 5050:5050 dpage/pgadmin4
# Access: https://my-workspace--5050.coder.example.com
Coder detects all three ports and generates three separate HTTPS URLs. Open them in different browser tabs - no localhost juggling, no port conflicts, everything just works through Coder’s proxy.
This is superior to basic port forwarding because:
- 🚀 No SSH tunnels needed - it’s HTTP/HTTPS through Coder
- 🔒 Built-in authentication - only authorized users can access
- 🌐 Works across networks - no firewall headaches
- 📱 Mobile-friendly - use phone/tablet to test your webapp
- 👥 Collaboration - share URLs with team (they need Coder access)
Coder supports wildcard domains for workspace access. The idea:
1
2
john-workspace-1.coder.example.com  # John's workspace
jane-dev-env.coder.example.com      # Jane's workspace
Each workspace gets a unique subdomain, automatically provisioned, with SSL certificates via Let’s Encrypt.
The setup (in theory):
- Point
*.coder.example.comto your Coder ingress (Traefik/nginx) - Configure Coder with
--access-url=*.coder.example.com - Coder generates workspace subdomains automatically
- Traefik/cert-manager requests wildcard SSL:
*.coder.example.com - Let’s Encrypt issues wildcard certificate via DNS challenge
The problem in my homelab:
I use Cloudflare for DNS and SSL termination. Cloudflare’s free tier doesn’t support wildcard SSL for subdomains like *.coder.ozteklab.com.
Specifically:
- ✅ Cloudflare can do:
*.ozteklab.com(wildcard at root domain) - ❌ Cloudflare cannot do on free tier:
*.coder.ozteklab.com(wildcard on subdomain)
To get wildcard SSL on *.coder.ozteklab.com, I’d need:
- Cloudflare Pro plan ($20/month) - for Advanced Certificate Manager
- OR Manual DNS challenge with Let’s Encrypt - exposes my origin IP, loses Cloudflare DDoS protection
Neither option was acceptable for a homelab.
The Better Solution: NetBird Zero-Trust Network Access
Multiple access options exist, but for this homelab setup, I chose NetBird VPN as the primary access method. Here’s why:
Option 1: Public Wildcard Domains (Not Chosen)
- Coder can be exposed to the internet with
*.coder.ozteklab.comfor workspace ports - The problem: Cloudflare free tier doesn’t support wildcard SSL on subdomains
- Manual DNS challenge workaround would work BUT exposes my origin/public IP address
- Security concern: Losing Cloudflare’s proxy protection means exposing homelab IP to the internet
- For a homelab, this trade-off isn’t worth it
Option 2: NetBird VPN (Chosen Solution) Instead, workspaces are private by default, and I can provide friends/developers/collaborators VPN access via NetBird when needed.
NetBird is an open source, zero-trust VPN built on WireGuard. It’s like Tailscale, but self-hosted and free.
The workflow when granting access:
- Developer logs in to Authentik (SSO)
- Authentik provides SSO to NetBird web UI
- Developer downloads NetBird client (Windows, macOS, Linux)
- NetBird client connects to NetBird control plane
- Developer joins private network - gets access to internal services:
- Coder:
https://coder.internal.ozteklab.com - Workspaces:
john-workspace-1.internal.ozteklab.com - Port forwarding:
https://workspace--3000.internal.ozteklab.com - Vault:
https://vault.internal.ozteklab.com - Grafana:
https://grafana.internal.ozteklab.com
- Coder:
Why NetBird is better for this use case:
- ✅ No Public IP Exposure: Origin IP stays hidden behind Cloudflare/firewall
- ✅ More Secure: Services not exposed to public internet scanning/attacks
- ✅ Granular Access Control: NetBird policies control who can reach what
- ✅ Works Anywhere: Developers can work from home, coffee shops, airports
- ✅ Zero Trust: Every connection authenticated and encrypted with WireGuard
- ✅ No DNS Complexity: Internal DNS, no Cloudflare SSL certificate limitations
- ✅ Selective Access: Give access only to trusted collaborators, not the entire internet
How NetBird enhances Coder:
- Developers on NetBird VPN can access workspaces via internal DNS
- Coder’s web proxy URLs work seamlessly:
https://workspace--8080.internal.ozteklab.com - Port forwarding through Coder control plane:
Coder agent → Control plane → Developer's VPN IP - Remote developers get full access to the homelab without exposing it publicly
Example: Remote Developer Workflow
1
2
3
4
5
6
7
# Developer's laptop (at home, coffee shop, anywhere)
netbird up  # Connect to VPN

# Now has secure access to:
https://coder.internal.ozteklab.com       # Coder UI
https://my-workspace--3000.internal...     # Proxied web apps
ssh my-workspace                           # Direct SSH via Coder CLI
The decision: For a homelab where security and IP privacy matter more than public convenience, NetBird provides enterprise-grade zero-trust access without the risks of exposing your public IP or paying for Cloudflare Pro just to get wildcard SSL.
I can still grant friends, collaborators, or team members access anytime via NetBird - but on MY terms, with full audit trails and granular permissions.
NetBird + Coder is the perfect combo for secure, remote-friendly, privacy-conscious cloud development environments.
- Knowing the IP address of the target machine
- Configuring SSH keys
- Updating
~/.ssh/configwith hostnames - Dealing with dynamic IPs when VMs move
Coder makes all of this irrelevant.
With Coder CLI:
1
2
3
4
5
6
7
8
coder ssh my-workspace

# What happens behind the scenes:
# 1. Coder CLI queries Coder API: "Where is my-workspace?"
# 2. Coder API returns: Agent ID, connection info
# 3. Coder CLI establishes WebSocket to Coder control plane
# 4. Coder control plane proxies connection to workspace agent
# 5. SSH session established, no IP address needed
You never need to know:
- What Proxmox node the VM is on
- Whether the VM migrated to a different node
Coming soon via QEMU Agent integration:
- VM internal IP addresses displayed in Coder UI (like proper cloud services!)
- Real-time resource metrics (CPU, RAM, disk usage)
- Network interface details
- All the metadata you’d expect from AWS/GCP - but for your homelab LOL
The magic:
coder ssh workspace-name- works every timecoder ssh --stdio workspace-name- use as ProxyCommand in~/.ssh/configcoder ssh -R 8080:localhost:8080 workspace-name- reverse tunnels for webhook testing
This is possible because:
- Coder agent runs in every workspace, maintains persistent connection to control plane
- Agent reports workspace status, listening ports, resource usage
- Control plane tracks all agents and their connectivity
- CLI proxies SSH through the control plane, no direct connection needed
Real-world benefit: I can stop/start/rebuild workspaces freely. Proxmox might assign a different IP every time. I don’t care. Coder handles the routing.
Agent APIs: Extending Coder for Task Orchestration
Coder provides a Coder Agent API that agents expose on http://127.0.0.1:41565. This API allows external tools (like AI models) to:
- Execute commands in the workspace
- Upload/download files
- Query workspace metadata
- Stream command output
We’ve extended this concept by building custom agent APIs:
1. Droid Agent API
Droid is our AI coding assistant (built on Claude via Aider). The Droid Agent API extends the base Coder agent with Droid-specific endpoints:
1
2
3
4
5
6
7
8
9
10
11
12
13
14
15
16
17
POST /api/droid/task
{
  "description": "Implement user authentication",
  "context": {
    "files": ["src/auth.py", "src/models.py"],
    "constraints": ["Use FastAPI", "Store passwords with bcrypt"]
  }
}

# Droid Agent:
# 1. Analyzes context files
# 2. Searches codebase for related patterns
# 3. Queries MCP servers (Outline docs, Git repos, Splunk logs)
# 4. Generates implementation plan
# 5. Writes code with Aider
# 6. Runs tests
# 7. Returns result with git diff
2. Codex Agent API
Similar to Droid, but for Claude Code (Anthropic’s coding assistant). Provides:
- Task delegation: Claude Code can ask Codex to handle subtasks
- Context sharing: Both agents see the same codebase, MCP servers
- Parallel execution: Codex works on backend while Claude Code works on frontend
3. Multi-Agent Task Orchestration
The real innovation: combining agents to solve complex problems.
Example: “Build a REST API with authentication, deploy to staging, update docs”
1
2
3
4
5
6
7
8
9
10
11
12
13
14
User Request → Claude Code (orchestrator)
                    ↓
      ┌─────────────┼─────────────┐
      ↓             ↓             ↓
   Droid       Codex API      Forgejo Agent
(Backend)    (Frontend)     (CI/CD Pipeline)
      ↓             ↓             ↓
  Writes API   Builds UI    Deploys to staging
      ↓             ↓             ↓
      └─────────────┼─────────────┘
                    ↓
          Outline MCP (updates docs)
                    ↓
              Complete!
Each agent has its own MCP server access, own workspace, and own task queue. The orchestrator (Claude Code) coordinates via agent APIs.
Why this is powerful:
- Specialization: Each agent optimized for specific tasks
- Parallelism: Multiple agents work simultaneously
- Context Isolation: Agents don’t pollute each other’s conversation history
- Composability: Add new agents without modifying existing ones
This is the future of AI-augmented development: Not one AI doing everything, but multiple specialized AIs collaborating, coordinated through APIs, all running in Coder workspaces.
Why Coder Enables All of This
Flexibility: Coder doesn’t dictate how workspaces work - you define them in Terraform
Extensibility: Agent API is open, documented, and encourages customization
Control: Self-hosted means you can modify anything - agents, control plane, even Coder’s source code
Integration: Coder’s API makes it easy to build orchestration layers, monitoring tools, custom UIs
This platform wouldn’t exist without Coder’s open source, API-first design. It’s not just a product - it’s a foundation for building whatever development environment you can imagine.
And that’s why it’s awesome.
Future: Pangolin VPN
While NetBird provides excellent zero-trust network access, we’re actively evaluating Pangolin as the next evolution of our VPN strategy. Pangolin offers [specific benefits/features that make it attractive for this use case], and we’ll be conducting a thorough comparison to determine if it’s the right fit for scaling this platform to larger teams.
Stay tuned for updates on the Pangolin evaluation and potential migration path.
Built Entirely on Open Source - Zero Licensing Costs
The Philosophy: Prove What’s Possible Without Licenses
I’m a Solutions Engineer at Splunk. I work with enterprise software daily, and I understand the value of commercial products. Splunk is part of this infrastructure for monitoring and observability because it’s what I know best, and it provides unparalleled visibility into complex systems.
But here’s the challenge I set for myself: Can I build an enterprise-grade cloud development platform using 100% open source software, with zero licensing costs?
The answer: Absolutely yes.
This entire platform - from the hypervisor to the developer workspaces - is built on battle-tested open source technologies. If you removed the Splunk monitoring (which is optional), you could deploy this entire stack for free.
The Complete Open Source Stack
| Component | Technology | Purpose | License |
|---|---|---|---|
| Compute | Proxmox VE | Hypervisor, VM management | AGPL-3.0 |
| Orchestration | K3s (Lightweight Kubernetes) | Container orchestration | Apache 2.0 |
| Developer Platform | Coder | Cloud development environments | AGPL-3.0 |
| Storage | TrueNAS Scale | ZFS-based NAS, NFS server | GPL/BSD |
| Identity | Authentik | SSO, OAuth provider | MIT |
| Secrets | HashiCorp Vault | Credentials management | MPL-2.0 |
| Git | Forgejo | Git server, CI/CD | MIT |
| Object Storage | MinIO | S3-compatible storage | AGPL-3.0 |
| Monitoring | Grafana | Metrics visualization | AGPL-3.0 |
| Metrics | Prometheus | Time-series database | Apache 2.0 |
| VPN | NetBird | Zero-trust network access | BSD-3 |
| AI Models | Codex, Droid (via Aider) | AI development assistants | Various (Claude API, OSS tools) |
| MCP Servers | Custom + Community | AI tool integrations | MIT/Apache 2.0 |
| Databases | PostgreSQL | Coder, Authentik persistence | PostgreSQL License |
| Reverse Proxy | Traefik | Ingress, SSL termination | MIT |
| DNS | Cloudflare (Free Tier) | Public DNS, DDoS protection | N/A (Service) |
Total Licensing Cost: $0 (excluding Splunk, which is optional and used for my job-related testing)
What This Proves
- Enterprise Features Don’t Require Enterprise Licenses
- SSO with MFA: Authentik (not Okta)
- Secrets Management: Vault (not CyberArk)
- Git + CI/CD: Forgejo (not GitHub Enterprise)
- Object Storage: MinIO (not AWS S3)
- Cloud IDEs: Coder (not Cloud9 or Gitpod Enterprise)
- Open Source Doesn’t Mean “Good Enough”
- These are the same technologies used by Fortune 500 companies
- Kubernetes (K3s variant) powers half the internet
- ZFS (TrueNAS) is used by Netflix, Proxmox by thousands of enterprises
- Vault is the de-facto secrets management standard
- The Cost is Time and Expertise, Not Money
- No software licenses to buy
- No per-user fees
- No artificial feature limitations
- Just needs someone willing to learn, design, and integrate
- Community Support is Real
- Active GitHub repos, Discord servers, forums
- Most issues have documented solutions
- Open source means you can read the code when stuck
- Contributions welcome - you can fix bugs yourself
The Design Effort: Where the Real Work Happens
Building this platform took months of research and iteration:
- Coder + Proxmox Integration: Not officially supported, had to figure out Terraform provider quirks
- NFS Persistence Architecture: Trial and error with ZFS datasets, Terraform lifecycle hooks, destroy provisioners
- MCP Server Architecture: Brand new protocol (launched Dec 2024), built custom HTTP-streamable servers
- Authentik SSO Integration: Mapping OAuth scopes to per-user credentials across 7+ services
- Vault Integration: Rotating credentials, Terraform provider for secrets injection
- AI Agent APIs: Extending Coder agents with custom APIs for task orchestration
This is the investment: learning, designing, testing, documenting. But once built, it’s yours forever, with no recurring costs.
Why I Chose Open Source (Despite Working at Splunk)
Transparency: I can inspect every line of code if something breaks
Flexibility: No vendor lock-in, migrate components as needed
Learning: Best way to understand systems is to build them from open source primitives
Portability: This architecture works in any environment - homelab, on-prem data center, or cloud VMs
Future-Proof: No risk of vendor discontinuation, price hikes, or forced migrations
The Splunk Component: Optional, But Valuable
Yes, there’s Splunk in this infrastructure for monitoring and logging. Why?
- It’s my job: I’m a Solutions Engineer, this is a learning platform for me
- Unmatched search: Splunk’s SPL for log analysis is unbeatable for complex queries
- AI Integration: Splunk MCP server lets AI query logs, analyze errors, correlate events
- Professional Tool: I wanted to validate that Splunk integrates seamlessly with open source
But you don’t need it. Alternatives:
- Grafana Loki: Open source log aggregation
- Elasticsearch + Kibana: Open source log analysis
- Prometheus + AlertManager: Metrics and alerting
- Graylog: Open source log management
The platform works perfectly fine with just Grafana + Prometheus + Loki. Splunk is my personal choice for specific use cases.
What You Can Build With This Stack
This isn’t a toy homelab - this is a production-ready platform that supports:
- Multi-user development environments with full isolation
- AI-augmented coding with multiple AI models and MCP servers
- SSO across all services with MFA enforcement
- Per-user resource quotas (storage, CPU, RAM)
- Git workflows with CI/CD (Forgejo Actions)
- Object storage for artifacts (MinIO S3)
- Metrics and monitoring (Grafana dashboards)
- Zero-trust network access (NetBird VPN)
- Secrets rotation (Vault + Terraform)
All for the cost of hardware (or cloud VMs if you prefer).
The Message: You Can Do This Too
If you’re reading this and thinking “I could never build something like this,” you’re wrong.
- I’m not a Kubernetes expert (I learned K3s for this project)
- I’m not a storage guru (I learned ZFS through trial and error)
- I’m not a security specialist (I Googled “Authentik OAuth scopes” dozens of times)
What I am: Willing to learn, document mistakes, and iterate.
The open source community gave me the tools. I gave it the time.
The result: A platform that rivals GitHub Codespaces or Gitpod, built for free, running in my homelab, under my complete control.
That’s the power of open source. That’s what makes this possible.
More to Come: Expanding the AI Ecosystem
The current AI integration is just the beginning. Several exciting enhancements are in active development:
Future State: Per-User AI Stack with Full Observability
The next evolution of the AI integration brings per-user AI authentication and observability through a sophisticated stack combining LiteLLM, cliProxy, Langfuse, and Vault.
Architecture: From Single-User to Per-User AI
1
2
3
4
5
6
7
8
9
10
11
12
13
14
15
16
17
18
19
20
21
22
23
24
25
26
27
28
29
30
31
32
33
34
35
36
37
38
39
40
41
42
43
44
45
46
47
48
49
50
51
52
53
Current State (Single User):                  Future State (Per-User):

+==================+                          +==========================+
|   AI Assistant   |                          |   Developer Workspace    |
|  (Claude Code)   |                          |   (Authenticated via     |
+==================+                          |    Authentik SSO)        |
         |                                    +==========================+
         | Single API key                                |
         | (shared)                                      | User-specific
         ↓                                               | OpenAI API key
+==================+                                      | (from Vault)
|   cliProxy       |                                      ↓
|  (OAuth to API)  |                          +==========================+
+==================+                          |      LiteLLM Proxy       |
         |                                    |   (OpenAI-compatible)    |
         |                                    |                          |
         ↓                                    |  - Multi-provider router |
+==================+                          |  - Cost optimization     |
| AI Providers     |                          |  - Automatic fallback    |
| (Claude, etc.)   |                          +==========================+
+==================+                                      |
                                                          | base_url config
                                                          ↓
                                              +==========================+
                                              |       cliProxy API       |
                                              |  (OAuth → API Key)       |
                                              |                          |
                                              |  User's authenticated    |
                                              |  session to AI providers |
                                              +==========================+
                                                          |
                                                          ↓
                                              +==========================+
                                              |      AI Providers        |
                                              |                          |
                                              |  - Claude (Anthropic)    |
                                              |  - Gemini (Google)       |
                                              |  - OpenAI                |
                                              |  - Qwen                  |
                                              +==========================+
                                                          |
                                                          | All interactions
                                                          | logged per-user
                                                          ↓
                                              +==========================+
                                              |       Langfuse           |
                                              |   (LLM Observability)    |
                                              |                          |
                                              |  - Token usage tracking  |
                                              |  - Cost per user         |
                                              |  - Performance metrics   |
                                              |  - Quality monitoring    |
                                              +==========================+
How It Works: The Complete Flow
1
2
3
4
5
6
7
8
9
10
11
12
13
14
15
16
17
18
19
20
21
22
23
24
25
26
27
28
29
30
31
32
33
34
35
36
37
38
39
40
41
42
43
44
45
46
47
48
49
50
51
52
53
54
55
56
57
58
59
60
61
62
63
64
65
66
67
68
69
70
71
72
73
74
75
76
77
78
79
80
81
82
83
84
85
86
87
88
89
90
91
92
93
94
95
96
97
98
99
100
101
102
103
104
105
106
107
108
109
110
111
112
113
114
115
116
117
118
119
120
121
122
+===========================================================================+
|                    WORKSPACE PROVISIONING FLOW                            |
+===========================================================================+

1. Developer Logs In
   +===================+
   |   john.doe        |
   |   Authentik SSO   |
   +===================+
            |
            | Authenticated
            ↓
   +===================+
   |   Coder Server    |
   |   Create workspace|
   +===================+
            |
            | Template parameter:
            | Enable AI Features? [Yes/No]
            ↓
   +===================+
   |   Terraform       |
   |   Provisioner     |
   +===================+
            |
            | If AI enabled:
            | Trigger Vault script
            ↓
   +===========================+
   |   Vault Server            |
   |                           |
   |   1. Generate OpenAI key  |
   |      for john.doe         |
   |                           |
   |   2. Create config:       |
   |      ~/.config/litellm/   |
   |         config.yaml       |
   |                           |
   |   3. Write to workspace:  |
   |      OPENAI_API_KEY=xxx   |
   |      LITELLM_URL=...      |
   +===========================+
            |
            ↓
   +===========================+
   |   Workspace VM            |
   |   /home/${username}/            |
   |                           |
   |   Config auto-deployed:   |
   |   - LiteLLM config        |
   |   - API keys              |
   |   - Environment vars      |
   +===========================+

+===========================================================================+
|                        AI REQUEST FLOW                                    |
+===========================================================================+

Developer writes code:
   +===================+
   |   Claude Code     |
   |   (in workspace)  |
   +===================+
            |
            | OpenAI API format
            | base_url: http://litellm:4000
            | api_key: john.doe-key-from-vault
            ↓
   +===========================+
   |   LiteLLM Proxy           |
   |   (Port 4000)             |
   |                           |
   |   - Receives request      |
   |   - Identifies user       |
   |   - Routes to cliProxy    |
   |   - Logs to Langfuse      |
   +===========================+
            |
            | Forward to cliProxy
            | (OpenAI-compatible endpoint)
            ↓
   +===========================+
   |   cliProxy API            |
   |   (Port 8317)             |
   |                           |
   |   - OAuth authenticated   |
   |   - User: john.doe        |
   |   - Provider: Claude      |
   +===========================+
            |
            | Make authenticated call
            ↓
   +===========================+
   |   Claude API              |
   |   (Anthropic)             |
   |                           |
   |   - john.doe's OAuth      |
   |   - john.doe's quota      |
   +===========================+
            |
            | Response
            ↓
   +===========================+
   |   LiteLLM Proxy           |
   |                           |
   |   - Log token usage       |
   |   - Log latency           |
   |   - Calculate cost        |
   +===========================+
            |
            | Store metrics
            ↓
   +===========================+
   |   Langfuse                |
   |                           |
   |   Recorded per user:      |
   |   - john.doe: 1,234 tok   |
   |   - Cost: $0.0247         |
   |   - Latency: 1.2s         |
   |   - Model: claude-3.5     |
   +===========================+
Component Details
1. LiteLLM Proxy
- Role: OpenAI-compatible router that sits between AI clients and providers
- Configuration:
```yaml
model_list:
- model_name: claude-3.5-sonnet litellm_params: model: openai/gpt-4 # Points to cliProxy api_base: http://cliproxy:8317/v1 api_key: ${OPENAI_API_KEY} # Per-user from Vault ```
- Features:
- Multi-model routing
- Cost optimization
- Automatic fallback
- Load balancing
2. cliProxy
- Current State: Single-user OAuth authentication
- Future State: Per-user OAuth sessions
- Challenge: Track which user is making which request
- Solution: User-specific API keys or OAuth tokens provisioned by Vault
3. Langfuse Integration
- Auto-configured by LiteLLM (native support)
- Tracks per-user:
- Token usage
- Cost per request
- Model performance
- Quality metrics
- Dashboard access: Per-user or admin views
4. Vault-Based Provisioning
- Workspace Creation Flow:
- User selects Enable AI Features in Coder template
- Terraform calls Vault script:
- Vault generates:
- OpenAI API key for john.doe
- LiteLLM config with user-specific settings
- Langfuse project ID for john.doe
- Vault writes config to workspace NFS mount
- Workspace starts with everything configured
Why This Architecture is Powerful
Automatic Per-User Setup
- Developer just clicks Enable AI when creating workspace
- All configuration happens automatically via Vault
- No manual setup, no shared credentials
True Multi-Tenancy
- Each developer has their own:
- OpenAI API key (unique identifier)
- OAuth sessions to AI providers
- Cost tracking in Langfuse
- Quota limits
Complete Observability
- Admin dashboard shows:
- Which developers use which models
- Cost per developer
- Token usage trends
- Performance metrics
- Developer dashboard shows:
- Their own usage
- Their own costs
- Model performance for their queries
Seamless Integration
- Developers use standard OpenAI SDKs
- Point base_url to LiteLLM
- Everything else is transparent
- Works with Claude Code, Continue, Cursor, etc.
Security & Compliance
- All AI interactions logged
- Per-user attribution
- Audit trail for compliance
- Revoke access per-user instantly
Current vs Future State Summary
| Aspect | Current State | Future State |
|---|---|---|
| Authentication | Single shared cliProxy session | Per-user OAuth via Vault |
| API Keys | Manual setup | Auto-provisioned by Vault |
| Observability | None | Full Langfuse tracking |
| Multi-Provider | Direct to cliProxy | LiteLLM routing layer |
| Cost Tracking | Manual/none | Automatic per-user |
| Setup | Manual configuration | Template checkbox |
| Revocation | Restart cliProxy | Per-user instant |
Implementation Status
✅ Already Built:
- cliProxy with OAuth authentication
- Vault integration for secrets
- NFS provisioning for workspace storage
- Authentik SSO for user identity
🚧 In Progress:
- Per-user cliProxy sessions
- Vault provisioning scripts for AI config
📋 Next Steps:
- LiteLLM deployment and configuration
- Langfuse integration
- Coder template updates with AI enablement checkbox
- User documentation
The foundation is solid. The pieces are ready. It’s just orchestration now.
LiteLLM Integration
LiteLLM provides a unified interface for multiple LLM providers (OpenAI, Anthropic, Azure, etc.). As described in the future architecture above, LiteLLM will serve as the intelligent routing layer between developers and AI providers.
Langfuse for Observability
Langfuse brings observability to LLM interactions. As shown in the architecture, Langfuse will automatically track all AI usage per-user through LiteLLM integration:
- Trace Every AI Request: See exactly what prompts are being sent to AI models
- Performance Metrics: Monitor latency, token usage, and costs per workspace
- Quality Analysis: Evaluate AI response quality and user feedback
- Debug AI Issues: Detailed traces for troubleshooting AI-assisted workflows
- Usage Analytics: Understand how teams are leveraging AI tooling
This addresses a critical gap in the current setup - right now, AI usage happens in a black box. Langfuse will provide full visibility into AI operations.
Refactored cliProxy with Enhanced Authentication
The cliProxy service is being enhanced to provide better multi-tenant support for AI tools:
- Improved Token Authentication: More robust credential handling for remote workspaces
- Multi-Workspace Support: Single proxy instance serving multiple workspaces
- Request Routing: Intelligent routing based on workspace context
- Audit Logging: Track all AI API requests with workspace attribution
- Rate Limiting: Per-workspace rate limits to prevent abuse
Since workspaces run on remote hosts, proper authentication and routing is critical for security and reliability. The refactored proxy will provide production-grade infrastructure for AI services.
cliProxy: OAuth Authentication for AI Services
 cliProxy script baked into workspace - enables OAuth authentication instead of API keys for AI services
One of the most innovative components of the AI integration is the cliProxy service - a custom-built proxy that enables OAuth-based authentication for AI services that typically require API keys.
The Innovation: OAuth Instead of API Keys
Many LLM providers (like OpenAI) require API keys for authentication. API keys present challenges:
- Static Credentials: No expiration, high-value targets for theft
- Sharing Issues: Hard to share access without sharing keys
- No Identity: Cannot tie requests to specific users
- Revocation Complexity: Revoking a key affects all users
The cliProxy solves this by translating OAuth authentication (which Coder already uses) into API key authentication for LLM providers.
Key Benefits:
Security & Identity
- No Shared API Keys: Each developer uses their own OAuth identity
- Automatic Expiration: OAuth tokens expire, keys rotate automatically
- User Attribution: Every AI request tied to specific developer identity
- Centralized Revocation: Disable user OAuth access = AI access revoked instantly
- Audit Trail: Know exactly who made which AI requests
The Bigger Picture:
When combined with LiteLLM and Langfuse, cliProxy creates a complete observability and routing layer that makes enterprise AI adoption practical and secure.
To be discussed in detail in future blog post - the OAuth authentication flow, token validation mechanics, and integration with enterprise identity providers deserves its own deep-dive.
ChatMock for Development and Testing
ChatMock enables local testing of AI integrations without consuming API credits:
- Local Development: Test AI workflows without external API calls
- CI/CD Integration: Automated testing of AI-assisted features
- Cost Savings: Development and testing without API costs
- Deterministic Testing: Reproducible AI responses for regression testing
This will be particularly valuable for template development and CI/CD workflows that involve AI tooling.
MCP Server Integration
The Model Context Protocol (MCP) provides a standardized way for AI models to interact with tools and data sources. Planned MCP integration includes:
- Profile-Based MCP Servers: Different MCP server configurations based on workspace template
- Custom Tool Definitions: Define workspace-specific tools that AI models can invoke
- Data Source Integration: Connect AI models to internal APIs, databases, and services
- MCP Proxy Service: Centralized routing and management of MCP server connections
Example Use Cases:
- AI model can query internal documentation via MCP
- AI can interact with issue trackers and project management tools
- AI can access codebase metadata and analysis tools
- AI can invoke custom deployment or testing workflows
Aider Toolkit (APTK) Integration
Aider Toolkit extends Aider with additional capabilities:
- Enhanced Code Analysis: Deeper semantic understanding of codebases
- Project Templates: AI-aware project scaffolding
- Refactoring Workflows: Structured refactoring with AI assistance
- Documentation Generation: Automated documentation from code analysis
OpenAI Proxy and API Management
A dedicated OpenAI proxy layer (and similar proxies for other providers) will provide:
- Centralized API Key Management: Keys stored in Vault, never in workspaces
- Request Transformation: Modify requests/responses for compatibility or filtering
- Usage Quotas: Enforce per-workspace or per-team usage limits
- Cost Allocation: Track API costs by workspace, template, or team
- Security Controls: Filter sensitive data from AI requests
Gemini Integration
Google Gemini integration is planned to expand the multi-model AI support:
- Gemini Pro: Access to Google’s latest LLM capabilities
- Multimodal Support: Leverage Gemini’s vision and code understanding
- Cost Diversity: Additional pricing options for AI workloads
- Provider Redundancy: Fallback options if other providers face issues
Combined with existing Aider, Claude, and Codex integration, developers will have access to multiple AI providers within a single workspace, enabling them to choose the best model for each task.
S3 Bucket Per Workspace
Per-workspace S3 bucket provisioning is in development to provide object storage for each workspace:
- Automated Bucket Creation: S3 bucket created automatically during workspace provisioning
- Pre-Configured Credentials: Environment variables and config files set up automatically
- Web Interface: Direct link to S3 management UI (via MinIO or similar)
- Quota Management: Storage quotas enforced at bucket level
- Use Cases: Artifact storage, backup destinations, data lake development, static asset hosting
Implementation Details:
1
2
3
4
5
6
7
8
# Automatic bucket creation during provisioning
s3-bucket-manager.sh create <username>-workspace

# Workspace gets environment variables:
export AWS_ACCESS_KEY_ID=<workspace-specific-key>
export AWS_SECRET_ACCESS_KEY=<workspace-secret>
export AWS_ENDPOINT_URL=https://s3.example.com
export S3_BUCKET_NAME=<username>-workspace
Developers can immediately start using S3 APIs without manual configuration, and access a web UI to manage buckets and objects.
Enhanced Workspace Metadata
The Coder agent provides rich metadata about each workspace that will be exposed to developers:
- Network Information: IP address, hostname, DNS configuration
- Resource Allocation: Actual CPU cores, RAM, storage allocations
- Performance Metrics: CPU usage, memory utilization, disk I/O
- Template Information: Which template version, parameter values used
- Lifecycle Events: Creation time, last start/stop, uptime
Use Cases:
- Debugging: Quickly identify resource constraints
- Documentation: Auto-generate environment documentation
- Monitoring Dashboards: Real-time workspace health visibility
- Optimization: Identify under/over-provisioned resources
This metadata will be accessible via CLI, web UI, and environment variables for programmatic access.
Desktop Workspace Support
With persistent home directories working reliably, the next major expansion is desktop workspace templates:
macOS Workspaces (UTM/QEMU)
- Use Case: iOS/macOS development, testing Safari, Xcode workflows
- Implementation: UTM-based macOS VMs with Coder agent
- Persistence: Home directory mounted via NFS, just like Linux workspaces
- Access: VNC or remote desktop for GUI applications
Windows Workspaces (Proxmox)
- Use Case: .NET development, Windows-specific tooling, cross-platform testing
- Implementation: Windows Server or Windows 11 Pro VMs
- Persistence: NFS mount or SMB share for home directory
- Access: RDP integration via Coder web UI
Linux Desktop Workspaces (Proxmox)
- Use Case: GUI application development, browser testing, full desktop experience
- Implementation: Ubuntu Desktop or similar with remote desktop
- Persistence: NFS home directory (same as existing templates)
- Access: VNC, RDP, or web-based remote desktop (noVNC)
Benefits of Desktop Workspaces:
- Complete Development Suites: Full IDE experience with GUI tools
- Multi-Platform Testing: Test applications across Windows, macOS, and Linux from single platform
- Resource Efficiency: Share expensive GUI resources across team
- Consistent Environments: Even desktop environments defined as code
The desktop workspace expansion will complete the suite, providing:
- CLI Workspaces: Current Linux terminal-based environments (✅ Production)
- Desktop Workspaces: Full GUI environments across all major OS platforms (🚧 In Development)
- Specialized Workspaces: GPU-accelerated, database-heavy, or embedded development workspaces (📋 Planned)
This makes Coder a truly universal development platform where any type of development environment can be provisioned on-demand.
The Bigger Picture
These integrations represent a comprehensive strategy to make AI-assisted development a core platform capability:
- Unified Experience: AI tools work consistently across all workspaces
- Observability: Full visibility into AI usage, costs, and performance
- Security: Centralized credential management and access control
- Flexibility: Support multiple AI providers and models
- Scalability: Infrastructure designed for team-wide AI adoption
The amount of planning, architecture, and engineering required to get this right is substantial. Its not just about installing tools - its about creating a cohesive platform where AI assistance integrates naturally with the development workflow while maintaining security, observability, and operational excellence.
These enhancements will transform Coder from a platform that provisions workspaces into a platform that provides AI-augmented development environments as a service.
Infrastructure as Code
All components are defined declaratively:
Terraform Templates
Templates define workspace resources:
1
2
3
4
5
6
7
8
9
10
11
12
13
14
15
16
17
18
resource "proxmox_virtual_environment_vm" "workspace" {
  count = data.coder_workspace.me.start_count

  node_name = var.proxmox_node
  vm_id     = var.vm_id

  cpu {
    cores = data.coder_parameter.cpu_cores.value
  }

  memory {
    dedicated = data.coder_parameter.memory_gb.value * 1024
  }

  initialization {
    user_data_file_id = proxmox_virtual_environment_file.cloud_init.id
  }
}
Cloud-Init Configuration
VMs are configured automatically on first boot:
1
2
3
4
5
6
7
8
9
10
11
12
13
#cloud-config
users:
  - name: coder
    groups: [sudo, docker]
    shell: /bin/bash
    sudo: ALL=(ALL) NOPASSWD:ALL

mounts:
  - [nfs-server:/path/to/home, /home/${username}, nfs, defaults, 0, 0]

runcmd:
  - systemctl enable coder-agent.service
  - systemctl start coder-agent.service
Dynamic Template Parameters: Cloud-Like Self-Service
One of the most powerful features of the platform is the dynamic template parameter system. This provides a true cloud-service experience where developers can customize their workspace resources through intuitive sliders and dropdowns in the Coder UI.
Interactive Resource Selection
When creating a workspace, developers are presented with interactive controls to select:
CPU Cores (Slider: 2-16 cores)
- Adjust based on workload requirements
- Real-time resource allocation
- No need to request infrastructure changes
Memory (Slider: 4GB-64GB)
- Choose RAM based on application needs
- Development workspaces typically use 8-16GB
- ML/AI workloads can scale to 32GB+
Storage Quota (Slider: 20GB-500GB)
- Dynamic NFS quota allocation
- Enforced at the ZFS dataset level
- Prevents runaway disk usage
Storage Backend (Dropdown)
- iSCSI: Ample capacity for general development
- NVMe: High-performance for I/O-intensive workloads
This slider-based interface transforms infrastructure provisioning from a ticketing process into an instant self-service experience.
Storage Template Options
The platform provides two distinct storage backends optimized for different use cases:
iSCSI Storage Template
Use Case: General development, ample storage capacity
- Capacity: Large storage pools with high capacity
- Performance: Good for most development workflows
- Cost: Efficient use of available storage
- Ideal For: Web development, general coding, documentation
NVMe Storage Template
Use Case: High-performance I/O workloads
- Capacity: Premium NVMe-backed storage
- Performance: Ultra-low latency, high IOPS
- Use Cases: Database development, compilation-heavy projects, containerized workloads
- Network: 10GbE connectivity provides excellent throughput
The ability to choose storage backend per workspace allows resource optimization - developers can use cost-effective iSCSI storage for most work, reserving NVMe storage for performance-critical tasks.
NFS Provisioning Integration
Behind the scenes, the template system integrates with custom provisioning scripts that handle the complete storage lifecycle:
Automated Dataset Creation
1
2
# Invoked by Terraform during workspace provisioning
truenas-dataset-manager.sh create <username> <quota_gb>
This script:
- Creates ZFS dataset:
pool/coder-home/<username> - Sets ZFS quota based on slider value
- Configures NFS export with appropriate permissions
- Returns NFS mount path to Terraform
Dynamic Quota Management
- Quotas are set at ZFS dataset level, not filesystem quotas
- ZFS provides hard limits that cannot be exceeded
- Users see accurate disk usage via
df -h
Resources & Technologies
This platform is built on these amazing open source projects and technologies:
Core Infrastructure
- Coder - Self-hosted cloud development environments
- Proxmox VE - Open source virtualization platform
- TrueNAS - ZFS-based network attached storage
-
Kubernetes (K3s) - Container orchestration platform
- NetBird - Open source zero-trust VPN and network access
- Pangolin - Next-generation VPN solution (planned)
Identity & Secrets Management
- Authentik - Open source identity provider and SSO
- HashiCorp Vault - Secrets management and encryption
AI & Development Tools
- LiteLLM - Universal LLM proxy for OpenAI-compatible APIs
- Langfuse - LLM observability and analytics platform
- ChatMock - Chat API mocking and testing
-
CLIProxyAPI - CLI-based proxy API router
- Plane - Open source project management and issue tracking
Monitoring & Observability
- Splunk - Enterprise monitoring and log analysis (optional, used for work)
Community Scripts
- Proxmox-TrueNAS Integration - Scripts for Proxmox and TrueNAS integration
Special thanks to all the open source maintainers and communities that make platforms like this possible!
Platform Stack: Coder · Proxmox VE · TrueNAS · Kubernetes · Authentik · Vault
AI Integration: LiteLLM · Langfuse · Claude · Aider
Architecture: Infrastructure as Code · Cloud Development Environments